本篇目标:彻底解决「App 抓不到包」的问题。不只是给你一个能用的绕过脚本——而是让你理解 HTTPS 的信任模型、SSL Pinning 的每一种实现方式、以及为什么特定的绕过方案能对应特定的实现方式。这样当你遇到脚本不管用的情况时,你知道该往哪个方向调整。
一、抓包的基本原理:为什么需要绕过
在进入 SSL Pinning 绕过之前,你需要先理解一个更基础的问题:HTTPS 抓包是怎么工作的,以及为什么它会被 SSL Pinning 阻止。
1.1 HTTPS 抓包的本质:中间人攻击
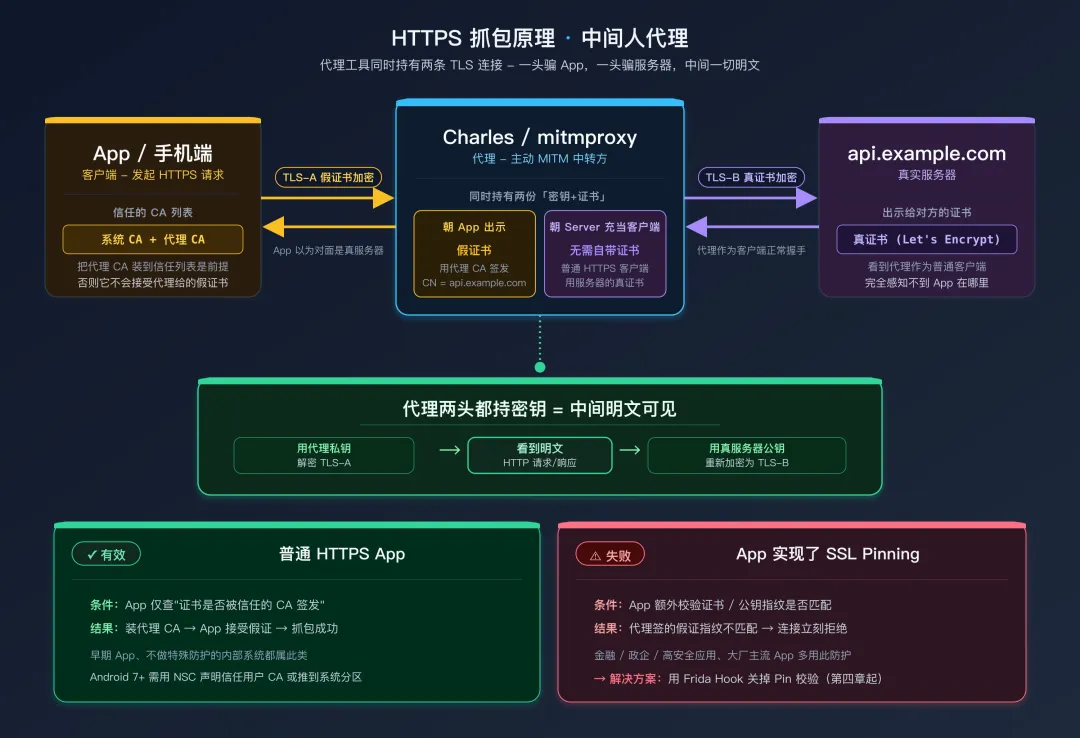
当你使用 Charles 或 mitmproxy 抓取 HTTPS 流量时,你实际上是在执行一次合法的中间人攻击(Man-in-the-Middle, MITM)。整个过程是这样的:
你在手机的 Wi-Fi 设置中配置了代理,所有 HTTP/HTTPS 流量都被路由到你电脑上运行的代理工具。当 App 向服务器发起 HTTPS 连接时,代理工具拦截了这个连接,并做了两件事。
第一件事是和 App 之间建立一个「假的」HTTPS 连接。代理工具临时生成一张针对目标域名的 SSL 证书(比如 api.example.com 的证书),用自己的 CA 根证书签名,然后把这张假证书发给 App。App 收到证书后会检查它是否可信——如果你已经把代理工具的 CA 根证书安装到手机的信任存储中,App 就会认为这张假证书是可信的,从而与代理建立加密连接。
第二件事是代理工具再以「真实客户端」的身份,与真正的服务器建立一个正常的 HTTPS 连接。
这样,代理工具就坐在 App 和服务器之间,两头都持有解密密钥:一头用假证书和 App 通信,一头用真证书和服务器通信。所有经过代理的流量在代理这里都是明文的——你就能看到完整的请求和响应了。
 HTTPS 抓包原理:中间人代理
1.2 SSL Pinning 的防御逻辑
上面整个方案能成功的关键前提是:App 会信任你安装的代理 CA 根证书。SSL Pinning(SSL 证书锁定)就是为了打破这个前提而存在的。
正常情况下,App 通过操作系统的「受信任的根证书列表」来判断一张证书是否可信。只要证书的签名链能追溯到列表中的某个根证书,就认为可信。当你把代理的 CA 证书安装到这个列表后,代理签发的所有假证书都会被信任。
SSL Pinning 的做法是:App 不再依赖操作系统的信任列表,而是在代码中硬编码了它信任的证书或公钥的指纹(hash)。在 TLS 握手阶段,App 收到服务器(或代理)发来的证书后,不只是检查它是否被系统信任的 CA 签发,还要额外检查这张证书的指纹是否与硬编码的指纹匹配。代理签发的假证书指纹自然和真实服务器的不同,校验失败,连接被拒绝。
这就是为什么你安装了 Charles 的 CA 证书,很多 App 仍然抓不到包——不是因为证书安装有问题,而是 App 根本不看你安装的证书,它只认自己硬编码的那一个。
Pin 的两种形式:
- Certificate Pinning(证书锁定):锁定整张证书的指纹。优点是精确;缺点是证书到期后必须更新 App
- Public Key Pinning(公钥锁定):只锁定证书中公钥的指纹。证书续期时只要公钥不变,Pin 就不需要更新。OkHttp 的
CertificatePinner 实际上锁定的是公钥(尽管名字叫 CertificatePinner)
1.3 Android 7.0+ 的额外变化
Android 7.0(Nougat, API 24)引入了一个重要的安全改进:App 默认不再信任用户安装的 CA 证书。在 Android 7.0 之前,用户安装到「受信任的凭据 → 用户」中的 CA 证书对所有 App 都有效。从 Android 7.0 开始,App 默认只信任系统预装的 CA 证书(存储在 /system/etc/security/cacerts/ 中),除非 App 在 network_security_config.xml 中明确声明信任用户证书。
<!-- AndroidManifest.xml 中引用 -->
<application android:networkSecurityConfig="@xml/network_security_config">

<!-- res/xml/network_security_config.xml -->
<!-- 只有这样配置,App 才会信任用户安装的 CA 证书 -->
<network-security-config>
    <base-config>
        <trust-anchors>
            <!-- 信任系统 CA(默认行为)-->
            <certificates src="system"/>
            <!-- 额外信任用户安装的 CA(需要显式声明)-->
            <certificates src="user"/>
        </trust-anchors>
    </base-config>
</network-security-config>
这意味着即使目标 App 没有实现 SSL Pinning,在 Android 7.0+ 的设备上你也可能抓不到包——因为代理的 CA 证书安装在「用户」分区而不是「系统」分区。
解决这个基础问题有三种方式(选其一):
第一种,将代理 CA 证书安装为系统 CA(需要 Root)。具体做法是将证书文件复制到 /system/etc/security/cacerts/ 目录下,文件名需要用特定的 hash 格式命名。Magisk 有现成的模块可以做这件事——常用的有 AlwaysTrustUserCerts、MoveCertificate等,挑一个活跃维护的即可。
Android 14+ 注意:从 Android 14(API 34)开始,/system 分区强制只读,即使 adb remount 也无法写入。新设备上推荐用 Magisk/Zygisk 模块自动把用户证书"提升"为系统证书,而不要再尝试手动 mount -o rw,remount。下面命令行版本(手动 mount + cp)仅适用于 Android 13 及以下,作为原理演示保留。
# 将代理 CA 证书安装为系统证书的步骤(需要 Root)
# 1. 获取证书的 hash 值
#   - PEM 格式(.pem / .crt 文本):默认就是 PEM,无需 -inform
#   - DER 格式(.der / .cer 二进制):加 -inform DER
openssl x509 -subject_hash_old -in charles-ca.pem -noout
# 输出例如: 9a5ba575

# 2. 重命名证书文件(hash + .0)
cp charles-ca.pem 9a5ba575.0

# 3. 推送到系统分区(Magisk 环境下)
adb push 9a5ba575.0 /data/local/tmp/
adb shell su -c "mount -o rw,remount /system"
adb shell su -c "cp /data/local/tmp/9a5ba575.0 /system/etc/security/cacerts/"
adb shell su -c "chmod 644 /system/etc/security/cacerts/9a5ba575.0"
adb reboot
第二种,使用 Frida Hook 绕过证书校验(本篇的主题)。这种方式不需要修改系统分区,更加灵活。
第三种,修改 APK 的 network_security_config.xml 添加对用户 CA 的信任,然后重打包安装(但这会改变签名,可能触发签名校验失败)。
推荐组合:在实际工作中,建议「系统 CA + Frida 绕过」双管齐下。系统 CA 解决 Android 7.0+ 的基础信任问题,Frida 绕过解决 App 自身的 SSL Pinning。两者配合,覆盖率最高。
二、先试两条命令:80% 的 App 就够了
在开始分析具体实现之前,先试一下社区维护的「通杀方案」。这两个工具内部已经覆盖了下面要讲的第 1-3 层中绝大多数主流实现,对常规 App 几乎不用动脑筋。
2.1 objection — 一条命令绕过
objection 是 SensePost 基于 Frida 开发的运行时分析工具,内置 SSL Pinning 一键绕过。
pip install objection

# 以 spawn 模式启动目标 App 并进入交互终端
objection -g com.example.app explore

# 在 objection 提示符下执行
android sslpinning disable
它内部依次 Hook 了 SSLContext.init / TrustManagerImpl.verifyChain / OkHttp3 CertificatePinner.check 等关键方法——本质上就是后面第四章到第六章要讲的几招的合集,只是被打包成了一句命令。
2.2 frida-multiple-unpinning — 覆盖面最广的脚本
社区脚本里覆盖面最广的是 frida-multiple-unpinning(GitHub 搜同名仓库即可,由 @httptoolkit 等多位作者持续维护)。直接挂上去:
frida -U -f com.example.app -l frida-multiple-unpinning.js
它默认覆盖:TrustManagerImpl、OkHttp 3.x/4.x、TrustKit、Conscrypt、HttpsURLConnection、NetworkSecurityConfig、Apache HTTP Client 等十几种实现。
2.3 什么时候必须往下读
通用方案不是万能。以下三类场景几乎一定失败,需要进入后续章节做"针对性 Hook":
- 类名被 ProGuard/R8 混淆 —— 通杀脚本按字面类名 Hook,混淆后命中不到。见第九章「对抗混淆」。
- SSL 校验在 Native 层 —— 通杀脚本只覆盖 Java 层。Flutter / 字节系产品 / 自带 libcurl 的应用都属于这一类。见第七章 Native SSL。
- App 检测到 Frida 直接闪退 —— 通杀脚本本身能加载,但 App 起来就死。见第 16-17 篇 Root 检测 / Frida 检测对抗。
理解了这层"先粗后细"的工作流,下面的五层模型不是"必读章节",而是"通用方案失败后的诊断地图"——出哪一层的事,你就翻到对应一节。
三、SSL Pinning 的实现层次:知己知彼
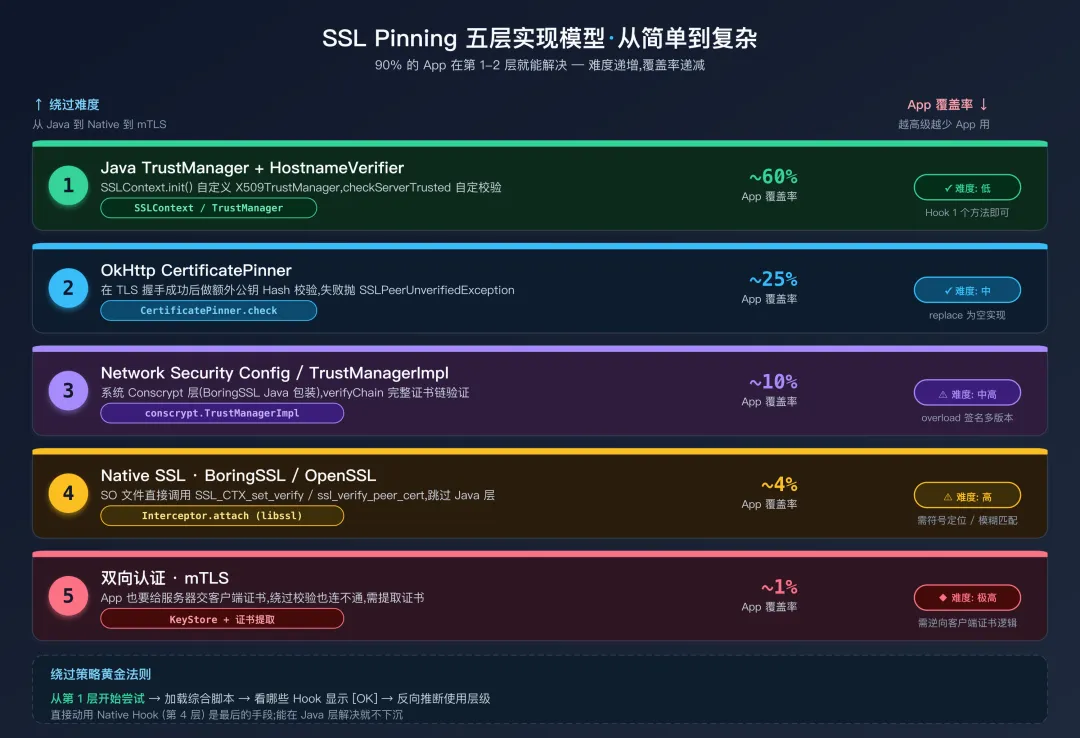
不同的 App 使用不同的方式实现 SSL Pinning。理解每一种实现方式的原理,是编写有效绕过脚本的基础。我把它们按照从简单到复杂排列,形成了一个五层模型。
3.1 五层模型
 SSL Pinning 五层实现模型
关于"覆盖率":上面五档来自作者多年实测的主观分档,不是统计意义上的占比。不过最近几年随着 Flutter / RN 普及与 Cronet 集成增多,第 4 层占比在快速上升——读者实战时如果觉得"似乎人人都在 Native 做",那是因为你看的样本里高安全应用更多,不代表全行业。
绕过策略的核心思路是:从第 1 层开始尝试,如果不生效再逐层递进。 大多数 App 在第 1-2 层就能解决;如果一上来就走第二章的通杀脚本,则更直接。
3.2 如何判断 App 使用了哪一层
在编写绕过脚本之前,有一些快速判断的方法:
用 jadx 反编译 APK 后搜索关键字:
- 搜到
CertificatePinner → OkHttp 证书锁定(第 2 层) - 搜到
X509TrustManager 或 checkServerTrusted → 自定义 TrustManager(第 1 层) res/xml/ 下的 network_security_config.xml 包含 <pin-set> 标签 → Android 原生 Pin(第 3 层)lib/ 下有自定义的 SSL 相关 SO 文件 → 可能是第 4 层- 搜到
KeyStore.load + KeyManagerFactory → 可能有 mTLS(第 5 层)
更高效的实战做法:直接加载一个覆盖 1-4 层的综合绕过脚本(见第十章),它会自动尝试所有层级的绕过。通过控制台日志中哪些 Hook 被触发(显示 [OK]),你可以反向推断 App 使用的是哪种实现。这比先分析再写脚本快得多。
四、第 1 层绕过:TrustManager 和 HostnameVerifier
4.1 原理:SSLContext 的信任链
Android 的 HTTPS 连接建立过程中,有一个关键类 javax.net.ssl.SSLContext。App 调用 SSLContext.init(KeyManager[], TrustManager[], SecureRandom) 来初始化 SSL 上下文。第二个参数 TrustManager[] 决定了这个 SSL 上下文如何验证服务器的证书。
正常情况下,App 传入 null 作为 TrustManager,表示使用系统默认的信任逻辑(信任系统 CA 列表中的所有证书)。当 App 想实现 SSL Pinning 时,它会创建一个自定义的 X509TrustManager,在 checkServerTrusted 方法中加入额外的校验逻辑——比如检查证书的公钥 SHA-256 hash 是否与预期值匹配。
我们的绕过思路就是:Hook SSLContext.init,将 App 传入的自定义 TrustManager 替换为一个「什么都不检查」的空实现。
为什么 Hook SSLContext.init 而不是 checkServerTrusted? 因为不同 App 的自定义 TrustManager 类名各不相同(而且很可能被混淆),逐一 Hook 不现实。而所有自定义 TrustManager 最终都要通过 SSLContext.init 注册到 SSL 上下文——这是一个统一的「咽喉」位置。
4.2 绕过代码(详细注释版)
Java.perform(function() {
    // === 步骤 1:创建一个信任所有证书的 TrustManager ===

    // Java.registerClass: Frida 的动态类创建 API
    // 在运行时创建一个新的 Java 类,实现 X509TrustManager 接口
    // 所有验证方法都是空实现 = 无条件信任任何证书

    var X509TrustManager = Java.use("javax.net.ssl.X509TrustManager");
    var SSLContext = Java.use("javax.net.ssl.SSLContext");

    var BypassTrustManager = Java.registerClass({
        // 类名随意,不与已有类冲突即可
        name: "com.frida.bypass.TrustManager",
        // 声明实现 X509TrustManager 接口
        implements: [X509TrustManager],
        methods: {
            // checkClientTrusted: 验证客户端证书
            // 在普通 HTTPS(单向 TLS)中不会被调用
            // 只有 mTLS 场景才会用到
            checkClientTrusted: function(chain, authType) {
                // 空实现:不做任何检查
            },

            // checkServerTrusted: 核心方法 - 验证服务器证书
            // 原始实现会在这里检查证书指纹,不匹配就抛 CertificateException
            // 我们的空实现不抛异常 = 无条件信任
            checkServerTrusted: function(chain, authType) {
                // 空实现:无条件信任服务器证书
                // 这里什么都不做,方法正常返回 = 验证通过
            },

            // getAcceptedIssuers: 返回受信任的证书颁发者列表
            // 返回空数组表示接受任何颁发者签发的证书
            getAcceptedIssuers: function() {
                return [];
            }
        }
    });

    // === 步骤 2:Hook SSLContext.init,替换 TrustManager ===

    // SSLContext.init 的三个参数:
    //   KeyManager[]  - 客户端密钥管理(mTLS 用),通常为 null
    //   TrustManager[] - 信任管理器(我们要替换这个)
    //   SecureRandom  - 随机数生成器,通常为 null

    SSLContext.init.overload(
        "[Ljavax.net.ssl.KeyManager;",     // JNI 签名:KeyManager[]
        "[Ljavax.net.ssl.TrustManager;",   // JNI 签名:TrustManager[]
        "java.security.SecureRandom"
    ).implementation = function(keyManagers, trustManagers, secureRandom) {

        console.log("[SSL] SSLContext.init 拦截");

        // 创建只包含 BypassTrustManager 的数组
        var bypassTm = BypassTrustManager.$new();
        var tmArray = Java.array("javax.net.ssl.TrustManager", [bypassTm]);

        // 用我们的 TrustManager 替换原始的,其他参数保持不变
        // 重要:保留 keyManagers 参数!如果 App 使用 mTLS,
        // keyManagers 中包含客户端证书,丢掉会导致 mTLS 握手失败
        this.init(keyManagers, tmArray, secureRandom);
    };

    // === 步骤 3:处理 HostnameVerifier ===

    // TLS 握手除了验证证书有效性,还验证证书中的域名(CN/SAN)
    // 是否与请求的域名匹配。HostnameVerifier 执行这个检查。
    // 代理签发的假证书域名通常是对的,但有些 App 会设置
    // 自定义的 HostnameVerifier 来执行更严格的检查。

    try {
        var HttpsURLConnection = Java.use("javax.net.ssl.HttpsURLConnection");

        // 拦截设置自定义 HostnameVerifier 的调用
        HttpsURLConnection.setDefaultHostnameVerifier.implementation = function(verifier) {
            console.log("[SSL] 拦截 setDefaultHostnameVerifier(忽略自定义 verifier)");
            // 不调用原始方法 = 不设置自定义 verifier = 使用默认验证
        };

        // 拦截设置自定义 SSLSocketFactory 的调用
        HttpsURLConnection.setSSLSocketFactory.implementation = function(factory) {
            console.log("[SSL] 拦截 setSSLSocketFactory(忽略自定义 factory)");
        };
    } catch(e) {
        // HttpsURLConnection 可能没有被 App 使用(现代 App 多用 OkHttp),忽略
    }

    console.log("[*] 第 1 层 SSL 绕过已加载");
});
4.3 为什么这套方案覆盖率高
因为大多数 App 的 SSL Pinning 实现都是在 Java 层通过自定义 TrustManager 完成的——不管它是直接实现了 X509TrustManager 接口,还是通过 TrustManagerFactory 加载了自定义的 KeyStore,最终都要调用 SSLContext.init 来注册这个 TrustManager。我们 Hook 的是 SSLContext.init 这个「咽喉」位置,所有走标准 Java TLS 栈的实现都绕不过它。
局限性:这套方案对以下情况无效:
(1) App 使用 OkHttp 的 CertificatePinner,因为 OkHttp 在 TLS 握手之后才做额外的 Pin 校验;
(2) App 在 Native 层做 SSL 校验,完全不经过 Java 的 SSLContext;
(3) Flutter/React Native 等框架,它们有自己的 TLS 实现。
五、第 2 层绕过:OkHttp CertificatePinner
5.1 OkHttp 的证书锁定机制
OkHttp 是 Android 生态中最流行的 HTTP 客户端库(Retrofit 底层用它,Volley 也可以配置使用 OkHttp 后端)。OkHttp 提供了一个内置的证书锁定 API——CertificatePinner。开发者可以这样使用它:
// App 中的典型 OkHttp 证书锁定配置
// Builder 模式逐一添加域名与公钥 hash 的映射
CertificatePinner pinner = new CertificatePinner.Builder()
    // 每个 add() 绑定一个域名和对应的公钥 SHA-256 hash
    // 同一个域名可以添加多个 hash(主证书 + 备用证书)
    .add("api.example.com", "sha256/AAAAAAAAAA...=")
    .add("api.example.com", "sha256/BBBBBBBBBB...=")
    .build();

// 将 CertificatePinner 配置到 OkHttpClient
OkHttpClient client = new OkHttpClient.Builder()
    .certificatePinner(pinner)
    .build();
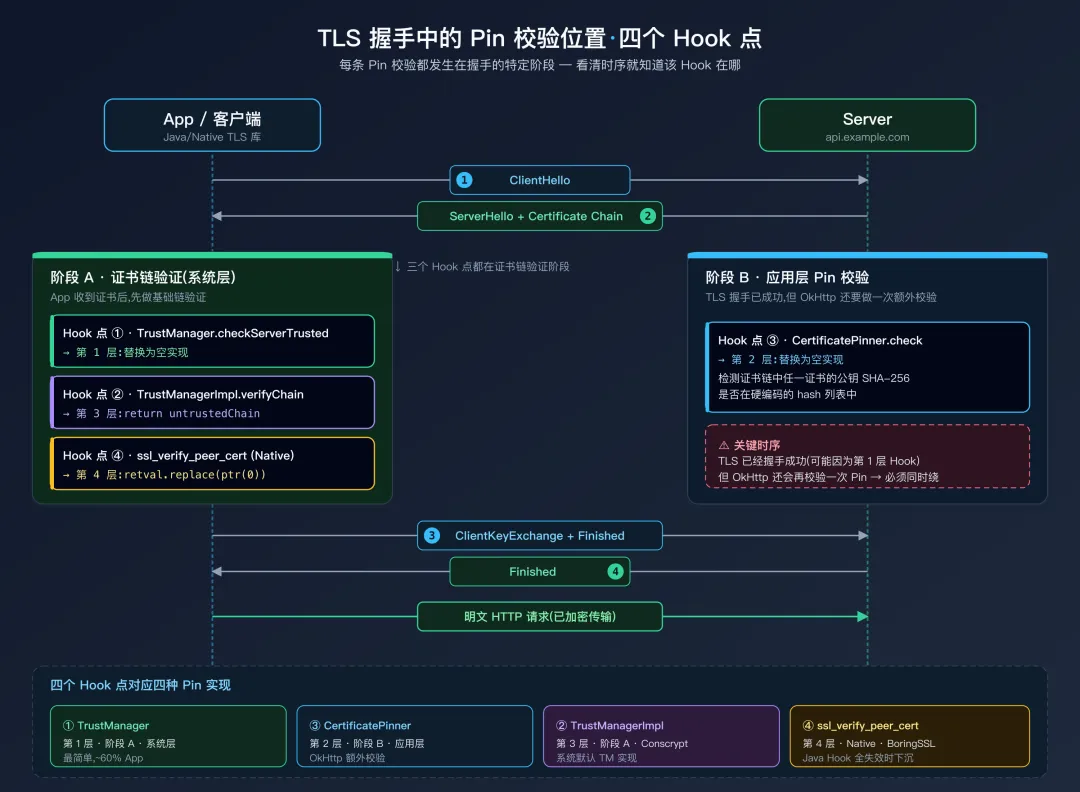
每个 .add() 调用将一个域名与一个证书公钥的 SHA-256 hash(Base64 编码)关联。在 TLS 握手完成后,OkHttp 会检查服务器证书链中是否有任何一个证书的公钥 hash 与配置的值匹配。如果没有匹配的,抛出 SSLPeerUnverifiedException,连接失败。
关键时序:OkHttp 的 CertificatePinner 校验发生在 TLS 握手之后。TLS 握手本身可能已经通过了(因为我们第 1 层已经替换了 TrustManager),但 OkHttp 在握手成功后还会做一次额外的 Pin 校验。所以第 1 层绕过对 OkHttp 不够——你需要同时绕过 CertificatePinner.check。
 TLS 握手过程中的 Pin 校验位置与 Hook 点
5.2 绕过代码
Java.perform(function() {
    // OkHttp3 的 CertificatePinner 绕过
    try {
        var CertificatePinner = Java.use("okhttp3.CertificatePinner");

        // 主要的 check 方法:check(String hostname, List peerCertificates)
        // 如果 Pin 校验失败,会抛出 SSLPeerUnverifiedException
        // 绕过方式:替换为空方法,什么都不做 = 不会抛异常 = 校验通过
        CertificatePinner.check.overload("java.lang.String", "java.util.List")
            .implementation = function(hostname, peerCertificates) {
            console.log("[SSL] OkHttp CertificatePinner.check 绕过: " + hostname);
            // 空实现:不抛异常 = 校验通过
        };

        // 兼容性处理:旧版本 OkHttp 的 check 方法可能接收 Certificate[] 而非 List
        try {
            CertificatePinner.check.overload(
                "java.lang.String", "[Ljava.security.cert.Certificate;"
            ).implementation = function(hostname, certs) {
                console.log("[SSL] OkHttp CertificatePinner.check(Certificate[]) 绕过: " + hostname);
            };
        } catch(e) {
            // 当前 OkHttp 版本没有这个重载,忽略
        }

        // Kotlin 版本的 OkHttp(4.x+)的内部方法名带有 $okhttp 后缀
        // 这是 Kotlin 编译器生成的 internal 方法的命名规则
        // 第二个参数是 Kotlin Function0<List<Certificate>>(惰性求值的证书列表)
        // 必须显式声明 overload 签名,避免多重载冲突时 Hook 失败
        try {
            CertificatePinner.check$okhttp.overload(
                "java.lang.String",
                "kotlin.jvm.functions.Function0"
            ).implementation = function(hostname, fn) {
                console.log("[SSL] OkHttp check$okhttp 绕过: " + hostname);
            };
        } catch(e) {}

        console.log("[*] OkHttp CertificatePinner 绕过成功");
    } catch(e) {
        // App 没有使用 OkHttp,ClassNotFoundException
        console.log("[*] OkHttp CertificatePinner 未检测到(App 可能不使用 OkHttp)");
    }
});
5.3 为什么需要 try-catch 包裹
整个 OkHttp 绕过代码被 try-catch 包裹。这是因为不是所有 App 都使用 OkHttp——如果 App 使用的是 HttpURLConnection、Volley(不带 OkHttp 后端)、或其他 HTTP 库,Java.use("okhttp3.CertificatePinner") 会抛出 ClassNotFoundException。用 try-catch 捕获这个异常,让脚本跳过 OkHttp 相关的 Hook,继续处理其他层级。
8六、第 3 层绕过:Android 平台特有的机制
6.1 Android 的 TrustManagerImpl
Android 操作系统内部有一个 TrustManagerImpl 类(全名 com.android.org.conscrypt.TrustManagerImpl),它是系统默认的 TrustManager 实现,基于 Google 的 Conscrypt(BoringSSL 的 Java 包装)库。即使 App 没有自定义 TrustManager,系统的 TrustManagerImpl 也会被使用。部分安全框架直接 Hook 或扩展这个系统类来实现 Pinning。
绕过方法是直接 Hook TrustManagerImpl 的关键验证方法:
try {
    // Conscrypt 是 Android 的默认 TLS 提供者
    var TrustManagerImpl = Java.use("com.android.org.conscrypt.TrustManagerImpl");

    // verifyChain: 执行完整证书链验证的核心方法
    // 参数说明:
    //   untrustedChain - App 从服务器收到的原始证书链(未验证)
    //   trustAnchorChain - 信任锚点证书链
    //   host - 请求的主机名
    //   clientAuth - 是否是客户端认证
    //   ocspData - OCSP (在线证书状态协议) 响应数据
    //   tlsSctData - Certificate Transparency SCT 数据
    //
    // 返回值:经过验证的证书链。验证失败则抛 CertificateException。
    // 绕过:直接返回传入的未验证证书链,跳过所有验证逻辑。
    TrustManagerImpl.verifyChain.implementation = function(untrustedChain,
        trustAnchorChain, host, clientAuth, ocspData, tlsSctData) {
        console.log("[SSL] TrustManagerImpl.verifyChain 绕过: " + host);
        return untrustedChain;  // 直接返回原始链 = 视为验证通过
    };

    console.log("[*] TrustManagerImpl 绕过成功");
} catch(e) {
    // 某些定制 ROM 或旧版 Android 可能没有 Conscrypt
    console.log("[*] TrustManagerImpl 未找到(可能不是 Conscrypt 实现)");
}
verifyChain 的参数变化:不同 Android 版本的 verifyChain 方法签名可能不同(参数数量可能是 4 个、5 个或 6 个)。如果 Hook 时报 overload 错误,可以通过 TrustManagerImpl.verifyChain.overloads 查看所有版本,然后逐一 Hook。
Android 11+ Hidden API 限制:com.android.org.conscrypt.* 是隐藏 API,从 Android 11(API 30)开始对第三方进程加了灰名单限制——Java.use 不一定报错,但 Hook 可能静默失败。如果观察不到日志输出,启动 frida-server 时加上 --enable-hidden-api(v14+ 支持),或在脚本里先调用 setHiddenApiExemptions("L");新版 Frida(≥16)默认已经处理这件事。
6.2 NetworkSecurityConfig(Android 原生 Pin)
 NSC 从 XML 配置到运行时校验的两层分发链路
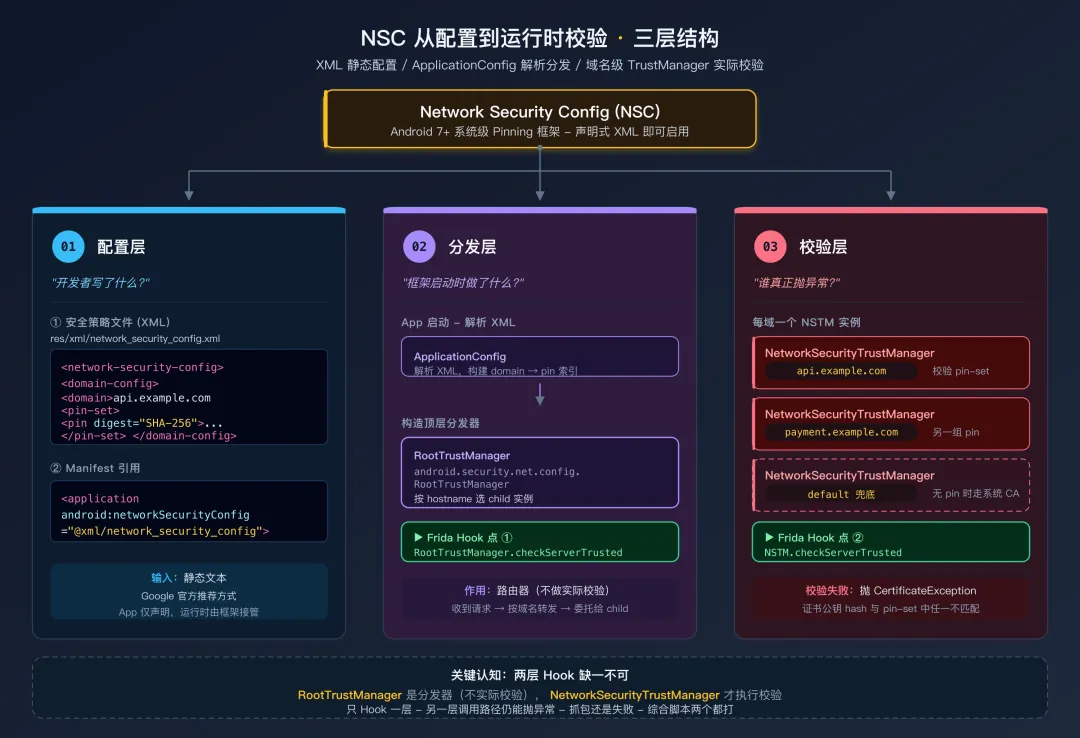
Android 7.0(API 24)起,Google 推荐通过 res/xml/network_security_config.xml 声明式地配置 Pinning——只要在 XML 里写 <pin-set>,框架就会在 TLS 握手后自动校验。这条路径的实际执行者是 android.security.net.config.NetworkSecurityTrustManager(域名级)与 android.security.net.config.RootTrustManager(顶层分发器),它们独立于第四章讲的 SSLContext.init 链路——也就是说,第 1 层 Hook 对它们无效,必须单独处理。
Java.perform(function() {
    // NetworkSecurityTrustManager:实际执行 pin 校验
    try {
        var NSTM = Java.use("android.security.net.config.NetworkSecurityTrustManager");

        // 两参数版本(标准 X509TrustManager 接口)
        NSTM.checkServerTrusted.overload(
            "[Ljava.security.cert.X509Certificate;", "java.lang.String"
        ).implementation = function(certs, authType) {
            console.log("[SSL] NetworkSecurityTrustManager.checkServerTrusted 绕过");
            // void 方法:直接 return = 校验通过
        };

        // 三参数版本(X509ExtendedTrustManager 扩展接口,带 hostname)
        // 返回值是"经过验证的证书链",给空 ArrayList 表示通过
        NSTM.checkServerTrusted.overload(
            "[Ljava.security.cert.X509Certificate;", "java.lang.String", "java.lang.String"
        ).implementation = function(certs, authType, host) {
            console.log("[SSL] NetworkSecurityTrustManager.checkServerTrusted(host) 绕过: " + host);
            return Java.use("java.util.ArrayList").$new();
        };
    } catch(e) {}

    // RootTrustManager:根据域名匹配把请求分派到具体的 NetworkSecurityTrustManager
    // 即使 NSTM 被 Hook,调用方也可能直接走 RootTrustManager.checkServerTrusted,
    // 所以两层都要拦
    try {
        var RTM = Java.use("android.security.net.config.RootTrustManager");
        RTM.checkServerTrusted.overload(
            "[Ljava.security.cert.X509Certificate;", "java.lang.String"
        ).implementation = function(certs, authType) {
            console.log("[SSL] RootTrustManager.checkServerTrusted 绕过");
        };
    } catch(e) {}
});
识别方式:反编译 APK 后查看 res/xml/network_security_config.xml,若包含 <pin-set> 节点即说明走的是这条路径。也可以直接搜 AndroidManifest.xml 中的 android:networkSecurityConfig 属性。
替代方案(非 Frida):直接改 network_security_config.xml,删掉 <pin-set> 节点后重打包签名——但会触发签名校验失败(如果 App 自带签名校验,见第 25 篇)。Frida Hook 这种方式更干净。
6.3 嵌入式 KeyStore:自带证书的 TrustManagerFactory
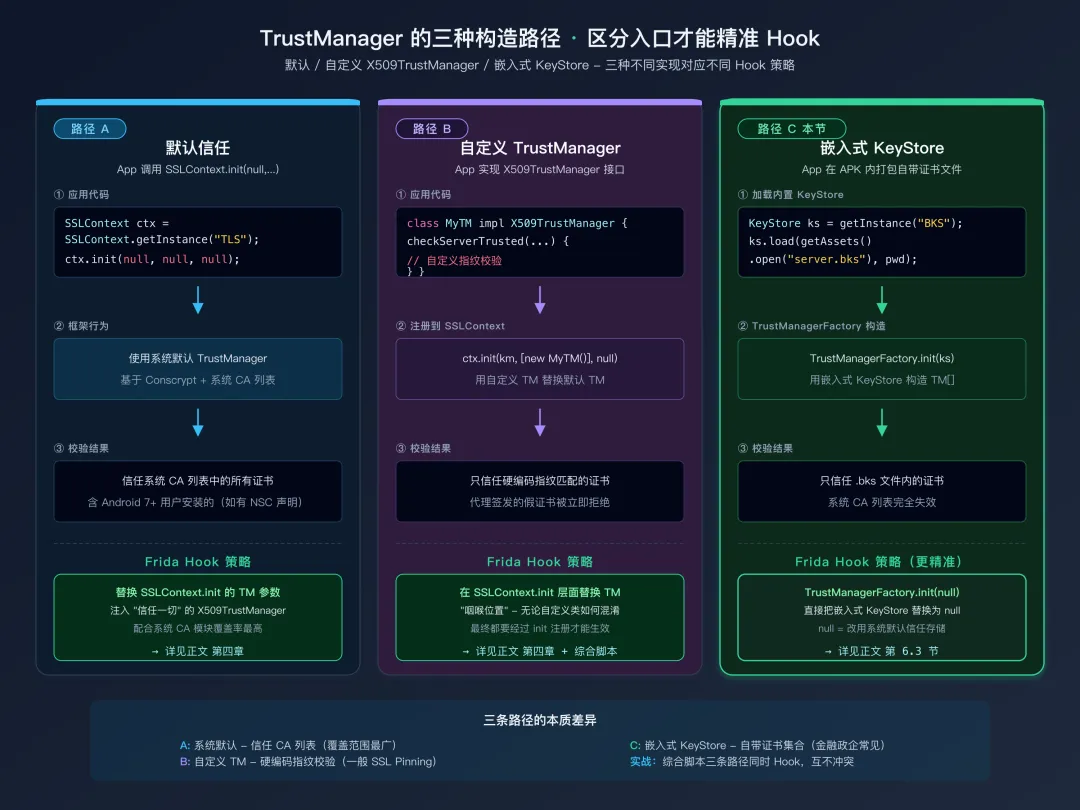 三种 TrustManager 构造路径对比
部分 App(金融类、政企类居多)会把"自己信任的服务器证书"直接打包进 APK,路径通常是 assets/server.bks、res/raw/cert.p12、assets/cacert.pem 等。运行时通过这样的代码加载:
// App 中的典型代码
KeyStore ks = KeyStore.getInstance("BKS");
ks.load(getAssets().open("server.bks"), "password".toCharArray());

TrustManagerFactory tmf = TrustManagerFactory.getInstance("X509");
tmf.init(ks);   // 关键:用自定义 KeyStore 构造 TrustManager

SSLContext ctx = SSLContext.getInstance("TLS");
ctx.init(null, tmf.getTrustManagers(), null);
这里产生的 TrustManager 只信任 KeyStore 里那张证书——和第四章讲的「自定义 X509TrustManager」是两种不同实现。第 1 层 Hook SSLContext.init 替换 TrustManager 也能搞定它,但更精准的入口是 TrustManagerFactory.init:
Java.perform(function() {
    var TMF = Java.use("javax.net.ssl.TrustManagerFactory");

    // 把传入的自定义 KeyStore 替换为 null
    // null = 使用系统默认信任存储(包含已安装的代理 CA)
    TMF.init.overload("java.security.KeyStore").implementation = function(keyStore) {
        console.log("[SSL] TrustManagerFactory.init(KeyStore) 绕过 — 改用系统默认");
        this.init(null);
    };
});
识别方式:反编译后在 assets/ / res/raw/ 下找 .bks / .p12 / .pfx / .cer / .pem 文件,再 grep TrustManagerFactory 与 KeyStore.load。
和第 1 层 Hook 的关系:本节的 Hook 与第四章的 SSLContext.init 替换是叠加关系——综合脚本(第十章)会两个都装,互不冲突。
6.4 WebView 的 SSL 错误处理
很多 App 包含 WebView 组件来展示网页内容。WebView 有自己独立的 SSL 错误处理机制——当遇到不受信任的证书时,会调用 WebViewClient.onReceivedSslError 回调。默认行为是调用 handler.cancel() 取消连接。
try {
    var WebViewClient = Java.use("android.webkit.WebViewClient");

    // onReceivedSslError: WebView 遇到 SSL 错误时的回调
    // 参数:view - WebView 实例, handler - SslErrorHandler, error - SslError
    // 默认行为是 handler.cancel()(拒绝加载)
    // 绕过:调用 handler.proceed()(继续加载,忽略 SSL 错误)
    WebViewClient.onReceivedSslError.implementation = function(view, handler, error) {
        console.log("[SSL] WebView SSL 错误绕过(错误: " + error.toString() + ")");
        // proceed() 指示 WebView 忽略 SSL 错误,继续加载页面
        handler.proceed();
    };

    console.log("[*] WebView SSL 绕过成功");
} catch(e) {}
安全提示:onReceivedSslError 的绕过只在 WebView 内生效。如果 App 的主要网络请求不通过 WebView 发送(大多数 App 都是这样),这个 Hook 只解决 WebView 内嵌网页的证书问题。
6.5 Cronet (Chromium 网络栈) 的处理
Google 的部分 App(如 YouTube、Chrome)和一些第三方 App 使用 Cronet 作为网络库。Cronet 是 Chromium 网络栈的独立封装,它有自己的证书校验逻辑,不走 Java 标准的 TrustManager。
try {
    var CronetEngineBuilder = Java.use("org.chromium.net.CronetEngine$Builder");

    // enablePublicKeyPinningBypassForLocalTrustAnchors:
    // 当设为 true 时,对于本地信任的 CA(用户安装的证书)不做 Pin 校验
    // 这正是我们需要的行为
    CronetEngineBuilder.enablePublicKeyPinningBypassForLocalTrustAnchors
        .implementation = function(enable) {
        console.log("[SSL] Cronet: 绕过本地信任锚点的 Pin 校验");
        // 强制传入 true,绕过 Pin 校验
        return this.enablePublicKeyPinningBypassForLocalTrustAnchors(true);
    };

    console.log("[*] Cronet 绕过成功");
} catch(e) {}
七、第 4 层绕过:Native SSL(BoringSSL / OpenSSL)
7.1 什么时候会遇到 Native 层 Pinning
当你加载了覆盖 1-3 层的绕过脚本,启动 App 后发现控制台没有任何 SSL 相关的日志输出,但 App 确实在联网(你可以通过 adb shell tcpdump -i any -c 10 port 443 确认有 TCP 流量到 443 端口),这说明 SSL 校验不在 Java 层,而在 Native 层。
Android 底层的 TLS 实现使用 BoringSSL(Google 维护的 OpenSSL 分支)。它的代码编译在 libssl.so 和 libcrypto.so 这两个系统库中。以下场景会遇到 Native 层 Pinning:
- Flutter App:Dart 的 HTTP 库直接调用 BoringSSL,完全不经过 Java 层
- React Native App:某些配置下使用 Native HTTP 实现
- 自带 Native HTTP 库的 App:如使用 libcurl 编译的 SO
- 游戏类 App:Unity/Unreal 引擎的网络模块通常在 Native 层
7.2 关键函数和绕过原理
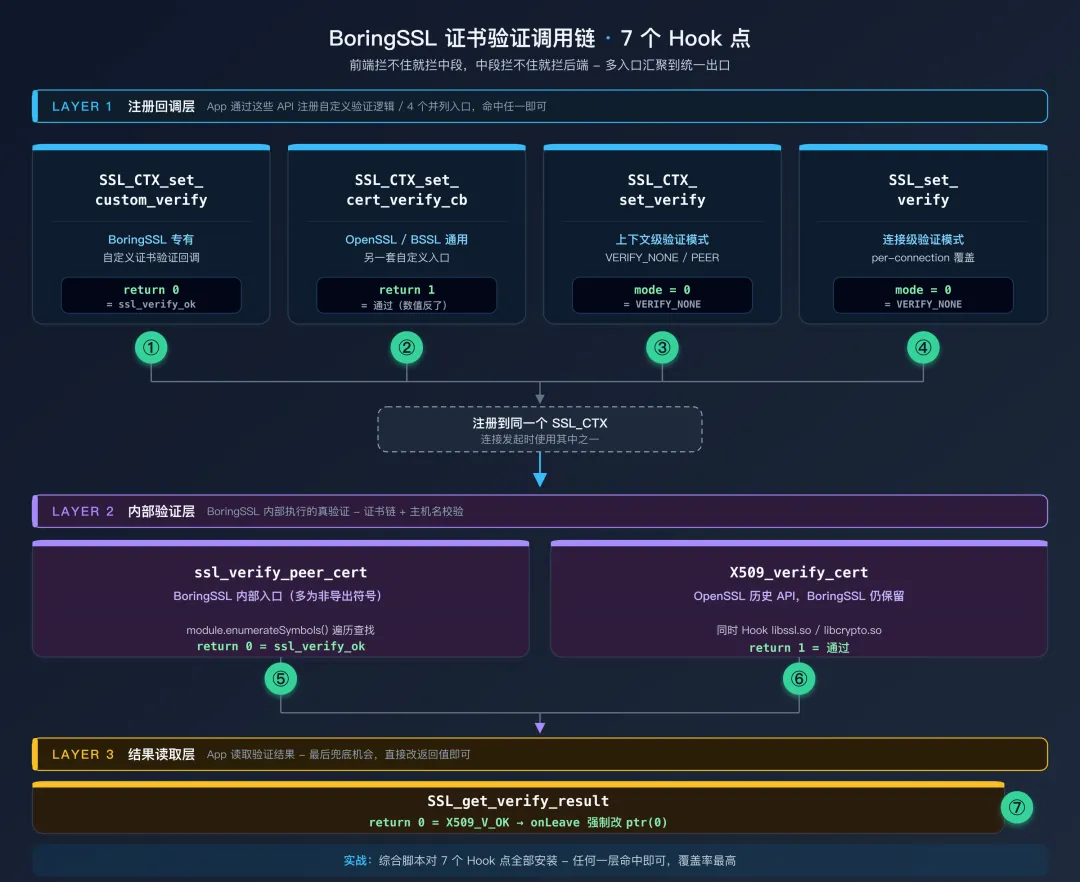 BoringSSL 证书验证调用链
BoringSSL/OpenSSL 中与证书验证相关的关键函数(按"被命中的概率"排序):
| 函数 | 作用 | 绕过方式 | 备注 |
|---|
SSL_CTX_set_custom_verify | BoringSSL:设自定义验证回调 | 替换回调为返回 0(ssl_verify_ok) | BoringSSL 专有 |
SSL_CTX_set_verify / SSL_set_verify | 设置验证模式(连接级 / 上下文级) | mode 强制设 0(SSL_VERIFY_NONE) | OpenSSL/BoringSSL 通用 |
SSL_CTX_set_cert_verify_callback | 另一套自定义验证入口 | 替换回调为返回 1(通过) | OpenSSL/BoringSSL 通用 |
SSL_get_verify_result | 读取验证结果 | 返回值强制改 0(X509_V_OK) | 兜底,简单粗暴 |
X509_verify_cert | 底层 X.509 链验证 | 返回值强制改 1(成功) | OpenSSL 历史 API,BoringSSL 也保留 |
ssl_verify_peer_cert | BoringSSL 内部入口(多为非导出) | 返回值强制改 0 | 需要遍历符号表查找 |
返回值差异提醒:SSL_CTX_set_custom_verify 的回调返回 ssl_verify_result_t 枚举(0 = ok, 1 = invalid, 2 = retry);SSL_CTX_set_cert_verify_callback 的回调返回布尔语义 int(1 = 成功, 0 = 失败);X509_verify_cert 也是 1 = 成功。一个返回 0 表示通过、一个返回 1 表示通过——抄代码时务必区分清楚,搞反了不会有任何报错但 Hook 完全无效。
7.3 系统 libssl.so 绕过代码(详细注释版)
// native_ssl_bypass.js
// 绕过 Native 层(BoringSSL/OpenSSL)的 SSL 证书校验
// 注意:这段代码不需要 Java.perform 包裹 - 它操作的是 Native 层

(function() {
    console.log("[*] 开始加载 Native SSL 绕过...");
    var hookCount = 0;

    // === Hook 1: SSL_CTX_set_custom_verify ===
    // C 函数签名:
    //   void SSL_CTX_set_custom_verify(
    //       SSL_CTX *ctx,           // SSL 上下文
    //       int mode,               // 验证模式
    //       enum ssl_verify_result_t (*callback)(SSL*, uint8_t*)  // 回调
    //   );
    // 绕过:将验证回调替换为始终返回 ssl_verify_ok (0) 的函数

    var fn1 = Module.findExportByName("libssl.so", "SSL_CTX_set_custom_verify");
    if (fn1) {
        Interceptor.attach(fn1, {
            onEnter: function(args) {
                // args[0] = SSL_CTX*  (保持不变)
                // args[1] = mode      (保持不变)
                // args[2] = callback  (替换为我们的空回调)

                // NativeCallback: Frida API,创建一个 C 函数
                // 签名: int callback(pointer ssl, pointer out_alert)
                // 返回 0 = ssl_verify_ok
                var alwaysOk = new NativeCallback(function(ssl, out_alert) {
                    return 0; // ssl_verify_ok
                }, "int", ["pointer", "pointer"]);

                args[2] = alwaysOk;  // 替换原始回调
                hookCount++;
            }
        });
        console.log("[Native SSL] SSL_CTX_set_custom_verify -> hooked");
    }

    // === Hook 2: SSL_set_verify ===
    // C 函数签名:
    //   void SSL_set_verify(
    //       SSL *ssl,               // SSL 连接对象
    //       int mode,               // SSL_VERIFY_NONE=0, SSL_VERIFY_PEER=1
    //       int (*callback)(int ok, X509_STORE_CTX *ctx)  // 回调
    //   );
    // 绕过:将 mode 强制设为 SSL_VERIFY_NONE (0),清空回调

    var fn2 = Module.findExportByName("libssl.so", "SSL_set_verify");
    if (fn2) {
        Interceptor.attach(fn2, {
            onEnter: function(args) {
                // 强制验证模式为 SSL_VERIFY_NONE
                args[1] = ptr(0);  // mode = 0 (不验证)
                args[2] = ptr(0);  // callback = null (无回调)
                hookCount++;
            }
        });
        console.log("[Native SSL] SSL_set_verify -> hooked");
    }

    // === Hook 3: X509_verify_cert(终极兜底)===
    // C 函数签名:
    //   int X509_verify_cert(X509_STORE_CTX *ctx);
    // 返回值: 1 = 验证成功, 0 或负数 = 验证失败
    // 绕过:如果原始返回值不是 1,强制改为 1

    ["libssl.so", "libcrypto.so"].forEach(function(lib) {
        var fn = Module.findExportByName(lib, "X509_verify_cert");
        if (fn) {
            Interceptor.attach(fn, {
                onLeave: function(retval) {
                    if (retval.toInt32() !== 1) {
                        retval.replace(ptr(1));  // 强制返回 1 (成功)
                    }
                }
            });
            console.log("[Native SSL] X509_verify_cert in " + lib + " -> hooked");
        }
    });

    // === Hook 4: SSL_CTX_set_cert_verify_callback ===
    // C 函数签名(OpenSSL/BoringSSL 通用):
    //   void SSL_CTX_set_cert_verify_callback(
    //       SSL_CTX *ctx,
    //       int (*cb)(X509_STORE_CTX *, void *),  // 注意:返回 int,1=成功,0=失败
    //       void *arg
    //   );
    // 这是 set_custom_verify 之外的另一套回调机制,
    // 同时 Hook 两者才能覆盖所有 NDK 应用写法。

    var fn4 = Module.findExportByName("libssl.so", "SSL_CTX_set_cert_verify_callback");
    if (fn4) {
        Interceptor.attach(fn4, {
            onEnter: function(args) {
                // 替换为始终返回 1(成功)的回调
                var alwaysPass = new NativeCallback(function(storeCtx, arg) {
                    return 1;
                }, "int", ["pointer", "pointer"]);
                args[1] = alwaysPass;
                hookCount++;
            }
        });
        console.log("[Native SSL] SSL_CTX_set_cert_verify_callback -> hooked");
    }

    // === Hook 5: SSL_get_verify_result(兜底)===
    // C 函数签名:
    //   long SSL_get_verify_result(const SSL *ssl);
    // 返回值: 0 = X509_V_OK(验证通过),其它值都是失败原因码
    // 绕过:直接把返回值改成 0
    // 注意:这只影响"读取结果"的代码路径——如果 App 在底层校验时
    // 已经 abort 了连接,光改这里没用。和前面 1-4 配合使用。

    var fn5 = Module.findExportByName("libssl.so", "SSL_get_verify_result");
    if (fn5) {
        Interceptor.attach(fn5, {
            onLeave: function(retval) {
                if (!retval.equals(ptr(0))) {
                    retval.replace(ptr(0));  // X509_V_OK = 0
                }
            }
        });
        console.log("[Native SSL] SSL_get_verify_result -> hooked");
    }

    // === Hook 6: X509_verify_cert(终极兜底)===
    // C 函数签名:
    //   int X509_verify_cert(X509_STORE_CTX *ctx);
    // 返回值: 1 = 验证成功, 0 或负数 = 验证失败
    // 绕过:如果原始返回值不是 1,强制改为 1

    ["libssl.so", "libcrypto.so"].forEach(function(lib) {
        var fn = Module.findExportByName(lib, "X509_verify_cert");
        if (fn) {
            Interceptor.attach(fn, {
                onLeave: function(retval) {
                    if (retval.toInt32() !== 1) {
                        retval.replace(ptr(1));  // 强制返回 1 (成功)
                    }
                }
            });
            console.log("[Native SSL] X509_verify_cert in " + lib + " -> hooked");
        }
    });

    // === Hook 7: BoringSSL 内部的 ssl_verify_peer_cert ===
    // 这个函数不是公开 API,但它是 BoringSSL 证书验证的核心入口
    // 在某些 Android 版本上,Hook 前面几个函数可能不够
    // 需要通过符号表搜索来定位

    try {
        var sslModule = Process.findModuleByName("libssl.so");
        if (sslModule) {
            // enumerateSymbols(): 遍历 SO 文件的符号表
            // 查找包含 "ssl_verify_peer_cert" 的符号
            sslModule.enumerateSymbols().forEach(function(sym) {
                if (sym.name.indexOf("ssl_verify_peer_cert") !== -1) {
                    Interceptor.attach(sym.address, {
                        onLeave: function(retval) {
                            // BoringSSL 中 ssl_verify_ok = 0
                            if (retval.toInt32() !== 0) {
                                retval.replace(ptr(0));
                            }
                        }
                    });
                    console.log("[Native SSL] ssl_verify_peer_cert -> hooked");
                }
            });
        }
    } catch(e) {}

    console.log("[*] Native SSL 绕过加载完成(" + hookCount + " 个 Hook 点)");
})();
7.4 独立打包的 libboringssl.so
部分 App(尤其是 Chromium 内核的 WebView 和高安全应用)会把 BoringSSL 打成独立的 libboringssl.so 与 APK 一起发布,而不是链接系统 libssl.so。系统库的 Hook 对它完全无效——必须把上一节的 Hook 复制一份指向这个独立库:
// 把第 7.3 节的 7 个 Hook 全部复制一份,把 "libssl.so" / "libcrypto.so" 改成
// "libboringssl.so"。这里给一段简化模板:
["libboringssl.so"].forEach(function(lib) {
    var mod = Process.findModuleByName(lib);
    if (!mod) return;
    console.log("[+] " + lib + " base=" + mod.base);

    // set_custom_verify
    var addr = Module.findExportByName(lib, "SSL_CTX_set_custom_verify");
    if (addr) Interceptor.attach(addr, {
        onEnter: function(args) {
            args[2] = new NativeCallback(function() { return 0; },
                "int", ["pointer", "pointer"]);
        }
    });

    // SSL_set_verify / SSL_CTX_set_verify
    ["SSL_CTX_set_verify", "SSL_set_verify"].forEach(function(fn) {
        var a = Module.findExportByName(lib, fn);
        if (a) Interceptor.attach(a, {
            onEnter: function(args) { args[1] = ptr(0); args[2] = ptr(0); }
        });
    });

    // SSL_get_verify_result 兜底
    var gv = Module.findExportByName(lib, "SSL_get_verify_result");
    if (gv) Interceptor.attach(gv, {
        onLeave: function(retval) { retval.replace(ptr(0)); }
    });
});
第十章的综合脚本会自动遍历 libssl.so、libboringssl.so、libttboringssl.so 三个候选名,不用手抄。
7.5 字节跳动系:libttboringssl.so 专项
libttboringssl.so 是字节跳动基于 BoringSSL 深度定制的 TLS 库——抖音、TikTok、今日头条、西瓜视频、飞书 等旗下产品几乎全用它。相比标准 BoringSSL 有三个差异点必须照顾:
- 导出符号精简 —— 内部验证函数多为非导出,
Module.findExportByName 经常返回 null。 - 额外 Pin 逻辑 —— 在 TLS 握手多个阶段注入自定义校验,光把
SSL_VERIFY_NONE 设上去不够。 - 延迟加载 —— 库不在 App 启动时就 dlopen,spawn 模式下脚本立刻去找
Process.findModuleByName("libttboringssl.so") 会返回 null。
下面这张时序图展示了 dlopen 监听如何解决延迟加载问题,配合后面的代码理解:
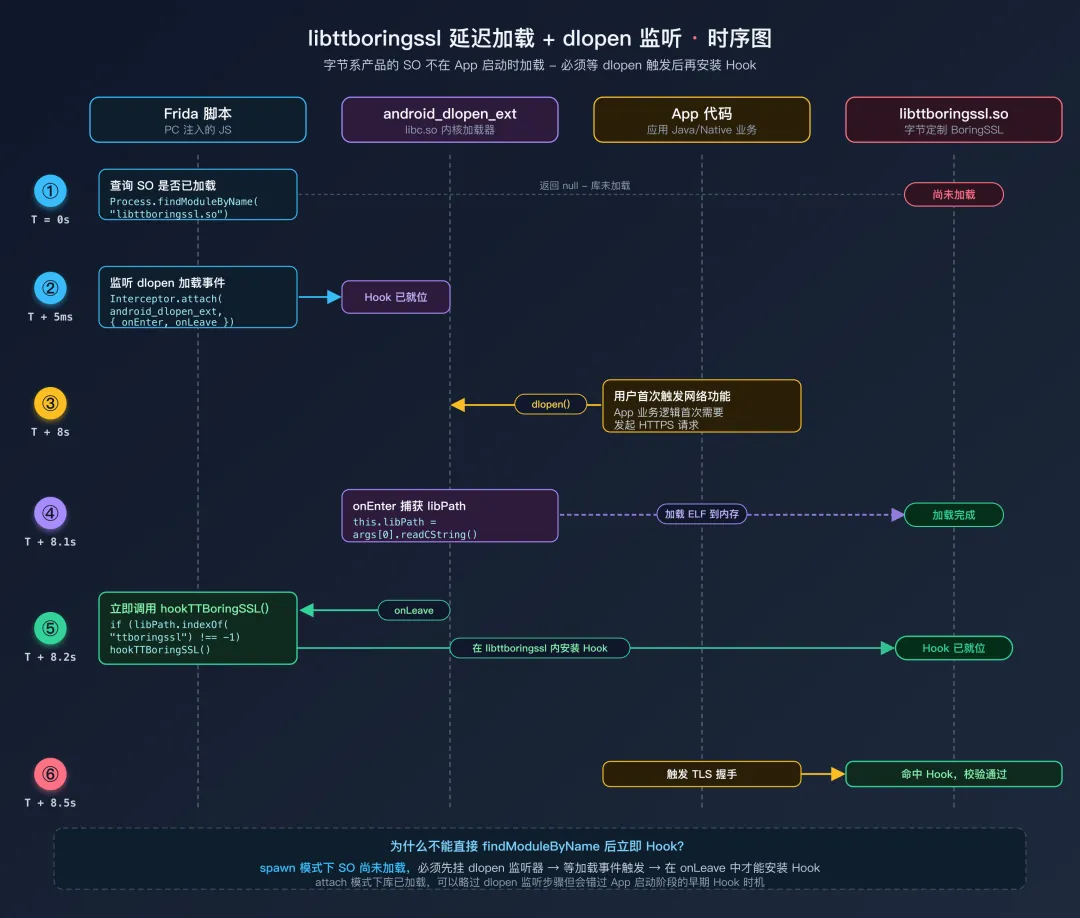 libttboringssl 延迟加载场景下的 6 步 Hook 安装时序
下面是覆盖这三个差异的完整方案:
// === Step 1:枚举导出符号(命令行先跑一次,看哪些能 Hook)===
//   adb shell rabin2 -E /data/app/<pkg>/lib/arm64/libttboringssl.so | grep -i verify

// === Step 2:在 JS 里写 Hook 入口 ===
function hookTTBoringSSL() {
    var lib = "libttboringssl.so";
    var mod = Process.findModuleByName(lib);
    if (!mod) { console.log("[-] " + lib + " 未加载"); return; }
    console.log("[+] " + lib + " base=" + mod.base + " size=" + mod.size);

    // 优先 Hook 导出的标准接口
    var targets = {
        "SSL_CTX_set_custom_verify": function(args) {
            args[2] = new NativeCallback(function(ssl, alert) { return 0; },
                "int", ["pointer", "pointer"]);
            console.log("[+] ttBSSL set_custom_verify -> ssl_verify_ok");
        },
        "SSL_CTX_set_cert_verify_callback": function(args) {
            args[1] = new NativeCallback(function(ctx, arg) { return 1; },
                "int", ["pointer", "pointer"]);
            console.log("[+] ttBSSL cert_verify_callback -> 1");
        },
        "SSL_CTX_set_verify": function(args) {
            args[1] = ptr(0); args[2] = ptr(0);
        },
        "SSL_set_verify": function(args) {
            args[1] = ptr(0); args[2] = ptr(0);
        }
    };

    Object.keys(targets).forEach(function(name) {
        var addr = Module.findExportByName(lib, name);
        if (addr) {
            Interceptor.attach(addr, { onEnter: targets[name] });
            console.log("[+] hooked " + name);
        } else {
            console.log("[-] " + name + " 未导出");
        }
    });

    // 兜底:SSL_get_verify_result
    var gv = Module.findExportByName(lib, "SSL_get_verify_result");
    if (gv) Interceptor.attach(gv, {
        onLeave: function(rv) { rv.replace(ptr(0)); }
    });
}

// === Step 3:dlopen 监听 — 处理延迟加载 ===
if (Process.findModuleByName("libttboringssl.so")) {
    hookTTBoringSSL();   // 已加载,立即上 Hook
} else {
    // 没加载就监听 dlopen / android_dlopen_ext
    var dlopenPtr = Module.findExportByName(null, "android_dlopen_ext")
                  || Module.findExportByName(null, "dlopen");
    Interceptor.attach(dlopenPtr, {
        onEnter: function(args) { this.libPath = args[0].readCString(); },
        onLeave: function() {
            if (this.libPath && this.libPath.indexOf("ttboringssl") !== -1) {
                console.log("[+] libttboringssl.so 刚加载,安装 Hook");
                hookTTBoringSSL();
            }
        }
    });
}
当导出符号都失效时:意味着字节又升级了。这时只能借助字符串特征定位偏移——在 IDA/Ghidra 里搜 "CERTIFICATE_VERIFY_FAILED" / "ssl_verify_peer_cert" 字符串,做 X-Ref 找到调用它的函数,把那个函数偏移记下来,然后:
var mod = Process.findModuleByName("libttboringssl.so");
Interceptor.attach(mod.base.add(0x3A5678), {  // 偏移按实际逆向结果替换
    onLeave: function(retval) { retval.replace(ptr(0)); }
});
7.6 libcurl:通过选项设置绕过
少数 NDK 应用直接用 libcurl 发请求。它的证书校验是通过 curl_easy_setopt 设置选项控制的——把两个选项强制设 0 即可:
// CURLOPT_SSL_VERIFYPEER = 64  服务器证书校验开关(默认 1 开启)
// CURLOPT_SSL_VERIFYHOST = 81  主机名校验等级(默认 2 严格,0 关闭)
var setopt = Module.findExportByName("libcurl.so", "curl_easy_setopt");
if (setopt) {
    Interceptor.attach(setopt, {
        onEnter: function(args) {
            var opt = args[1].toInt32();
            if (opt === 64 || opt === 81) {
                console.log("[curl] setopt " + opt + " -> 0 (disabled)");
                args[2] = ptr(0);
            }
        }
    });
}
7.7 Flutter App 的特殊处理
Flutter 使用 Dart 的 dart:io HTTP 库,它内部使用 BoringSSL 但通过 libflutter.so 而非系统的 libssl.so,且符号通常被 strip——只能靠特征字符串定位。社区维护的 reFlutter 和各种 flutter-ssl-bypass 脚本覆盖了常见 Flutter 版本,无需自己写。
// 只有少数 Flutter 版本保留了符号,可以试试:
var fn = Module.findExportByName("libflutter.so",
    "ssl_crypto_x509_session_verify_cert_chain");
// 找不到就需要 reFlutter 修过的 SO 来替换,或按版本号查找社区脚本。
7.8 Native Hook 的重要细节
为什么不需要 Java.perform? Interceptor.attach 和 Module.findExportByName 是 Frida 的 Native API,直接操作进程内存中的机器码,不需要 ART VM 的参与。在脚本顶层直接调用即可。
Module.findExportByName 的工作原理:它在指定 SO 文件的导出符号表(ELF 的 .dynsym 段)中按名称查找函数,返回内存中的实际地址。如果函数不存在(如 SO 未加载或符号被 strip),返回 null——所以前面所有 Hook 都用 if (fn) {...} 包了一层,防 NPE。
Native Hook 与 spawn / attach 模式的关系:spawn 模式(-f 参数)下脚本在 App 进程刚启动、库还没全部加载时就开始跑,常导致 findModuleByName 返回 null。两种应对方式:
- 配合
dlopen 监听器,等待目标库加载后再 Hook(第 7.5 节已示范); - 或者用 attach 模式(先让 App 跑起来再
frida -U <pkg>),所有库都已就位,但脚本错过 App 启动阶段的 Hook 时机。
八、第 5 层:双向认证(mTLS)
8.1 mTLS 与普通 TLS 的区别
普通的 HTTPS(单向 TLS)中,只有客户端验证服务器的身份——通过检查服务器发来的证书。服务器不验证客户端的身份。
双向认证(Mutual TLS, mTLS)中,两个方向都要验证:客户端验证服务器,服务器也验证客户端。这意味着 App 内部嵌入了一个客户端证书和对应的私钥。在 TLS 握手过程中,服务器会要求 App 提供客户端证书,并验证这个证书是否有效。
mTLS 给抓包带来的额外困难:即使你绕过了 App 端的证书验证(让 App 信任代理的证书),你的代理工具在与真正的服务器通信时,也需要提供 App 的客户端证书——否则服务器会拒绝连接。所以你需要从 App 中提取客户端证书和私钥,然后配置到代理工具中。
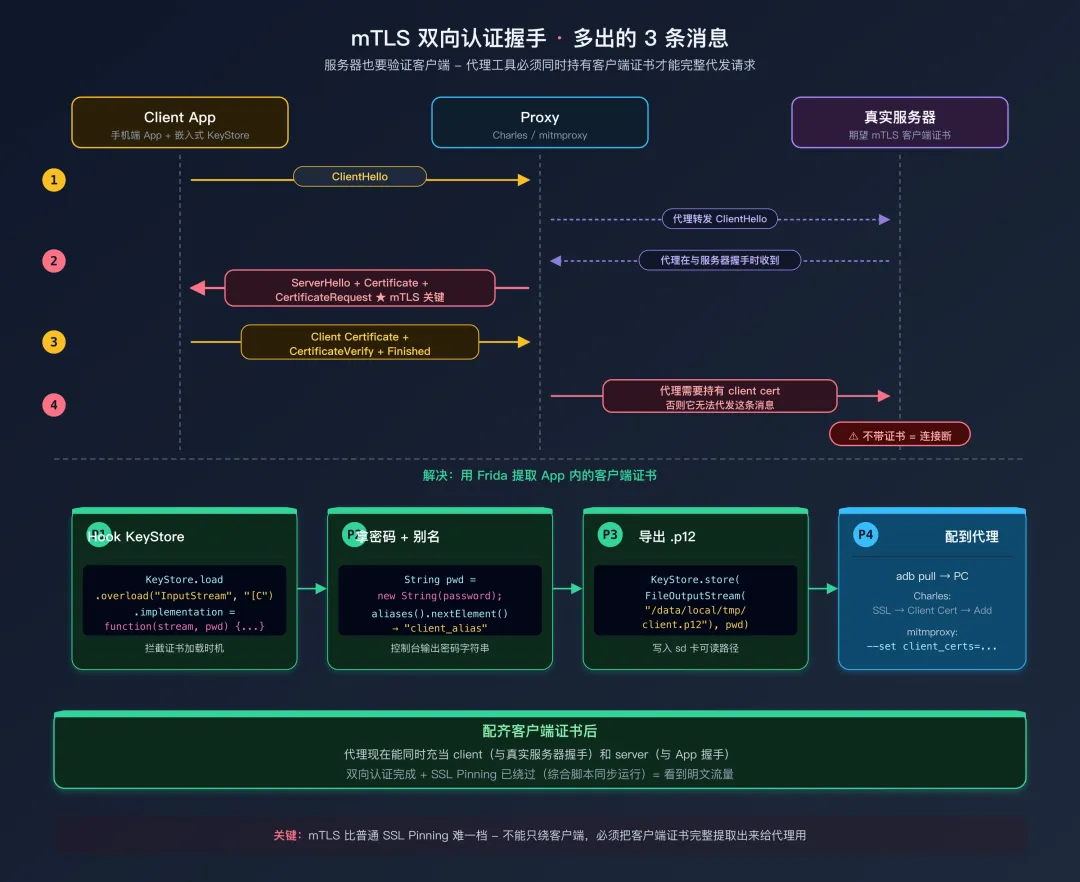 mTLS 双向认证握手时序
8.2 提取客户端证书
// mtls_extract.js
// 从 App 中提取 mTLS 客户端证书的密码和详细信息
Java.perform(function() {
    // === 提取 KeyStore 密码 ===
    // 客户端证书通常存储在 PKCS12 格式的 KeyStore 中(.p12 或 .bks 文件)
    // App 调用 KeyStore.load(inputStream, password) 加载它
    // Hook 这个方法可以拿到密码

    var KeyStore = Java.use("java.security.KeyStore");
    KeyStore.load.overload("java.io.InputStream", "[C")
        .implementation = function(stream, password) {

        // password 参数是 char[],转换为 String 打印
        if (password) {
            var pwdStr = Java.use("java.lang.String").$new(password);
            console.log("[mTLS] KeyStore.load 密码: " + pwdStr);
        }

        // 获取 KeyStore 类型(PKCS12, BKS, JKS 等)
        console.log("[mTLS] KeyStore 类型: " + this.getType());

        // 调用原始方法完成加载
        this.load(stream, password);

        // 加载完成后,枚举 KeyStore 中的所有条目
        var aliases = this.aliases();
        while (aliases.hasMoreElements()) {
            var alias = aliases.nextElement().toString();
            console.log("[mTLS] 别名: " + alias);

            try {
                var cert = this.getCertificate(alias);
                if (cert) {
                    // 向下转型为 X509Certificate 以获取详细信息
                    var x509 = Java.cast(cert,
                        Java.use("java.security.cert.X509Certificate"));
                    console.log("  主题: " + x509.getSubjectDN());
                    console.log("  颁发者: " + x509.getIssuerDN());
                    console.log("  有效期: " + x509.getNotBefore() +
                                " 至 " + x509.getNotAfter());
                    // 获取公钥算法(RSA / EC)
                    console.log("  公钥算法: " + x509.getPublicKey().getAlgorithm());
                }
            } catch(e) {}

            // 检查是否包含私钥(PrivateKeyEntry 表示有私钥)
            try {
                if (this.isKeyEntry(alias)) {
                    console.log("  [包含私钥] 这是客户端证书条目");
                }
            } catch(e) {}
        }
    };

    // === 提取 KeyManagerFactory 密码 ===
    // KeyManagerFactory.init 初始化密钥管理器,同样需要 KeyStore 密码
    var KeyManagerFactory = Java.use("javax.net.ssl.KeyManagerFactory");
    KeyManagerFactory.init.overload("java.security.KeyStore", "[C")
        .implementation = function(ks, password) {
        if (password) {
            console.log("[mTLS] KeyManagerFactory 密码: " +
                Java.use("java.lang.String").$new(password));
        }
        this.init(ks, password);
    };

    console.log("[*] mTLS 证书提取 Hook 已加载");
    console.log("[*] 请触发 App 的网络请求,等待证书加载...");
});
提取到密码和 KeyStore 类型后,你需要:
- 找到 App 中的证书文件(通常在 APK 的
assets/ 或 res/raw/ 目录下,格式为 .p12、.bks 或 .pfx) - 将它从 APK 中解压出来
- 配置到 Charles 或 mitmproxy 中作为客户端证书使用
# Charles 配置 mTLS 客户端证书:
# Proxy → SSL Proxying Settings → Client Certificates → Add
# 导入 .p12 文件并输入密码

# mitmproxy 配置客户端证书:
mitmproxy --set client_certs=/path/to/client.p12
九、对抗混淆:当类名不再叫 CertificatePinner
前面所有 Hook 都假设你能直接 Java.use("okhttp3.CertificatePinner")——但稍微上点防护的 App 都会用 ProGuard/R8 把它混淆成 a.b.c、方法名变成 a(),按字面类名 Hook 直接 ClassNotFoundException。这一节给三个不靠类名的定位策略,按从易到难排列。
9.1 策略 A:接口枚举(最稳,优先尝试)
Java 标准库的接口(X509TrustManager、HostnameVerifier、SSLSocketFactory 等)名是 API 契约的一部分,ProGuard 不会重命名。我们用 Java.choose 在堆里枚举所有实现了这些接口的实例,反查出混淆后的类名:
Java.perform(function() {
    // 枚举堆中所有 X509TrustManager 实例
    Java.choose("javax.net.ssl.X509TrustManager", {
        onMatch: function(instance) {
            // 输出运行时实际类名(混淆后的)
            console.log("[Found X509TrustManager] " + instance.getClass().getName());
        },
        onComplete: function() {}
    });

    // 同理枚举 HostnameVerifier、SSLSocketFactory
    Java.choose("javax.net.ssl.HostnameVerifier", {
        onMatch: function(instance) {
            console.log("[Found HostnameVerifier] " + instance.getClass().getName());
        },
        onComplete: function() {}
    });
});
跑完后控制台会列出类似 a.b.c$1、com.example.x.y 这样的名字——这就是混淆后的 TrustManager。拿到名字后再 Java.use(那个名字) 针对性 Hook。
注意:Java.choose 只能找到已经被实例化的对象。要在 App 触发过一次 HTTPS 请求之后再跑,否则堆里还没有 TrustManager 实例。
9.2 策略 B:异常构造函数追溯(最准,知道是 Pinning 失败时用)
如果 App 的 Pinning 校验失败会闪退或报"网络错误",几乎可以肯定它内部抛了 CertificateException 或 SSLPeerUnverifiedException。Hook 这两个异常的构造函数,能直接拿到完整调用栈——栈里就有混淆后的执行类名:
Java.perform(function() {
    var Log = Java.use("android.util.Log");
    var Exception = Java.use("java.lang.Exception");

    // Hook CertificateException 构造函数
    var CertException = Java.use("java.security.cert.CertificateException");
    CertException.$init.overload("java.lang.String").implementation = function(msg) {
        console.log("\n[!] CertificateException: " + msg);
        // 抛个新异常拿到当前调用栈
        console.log(Log.getStackTraceString(Exception.$new()));
        return this.$init(msg);
    };

    // Hook SSLPeerUnverifiedException(OkHttp Pin 校验失败抛这个)
    var SSLEx = Java.use("javax.net.ssl.SSLPeerUnverifiedException");
    SSLEx.$init.overload("java.lang.String").implementation = function(msg) {
        console.log("\n[!] SSLPeerUnverifiedException: " + msg);
        console.log(Log.getStackTraceString(Exception.$new()));
        return this.$init(msg);
    };
});
输出长这样:
[!] SSLPeerUnverifiedException: Certificate pinning failure!
java.lang.Exception
    at javax.net.ssl.SSLPeerUnverifiedException.<init>(...)
    at a.b.c.d(SourceFile:42)         ← 这一行就是混淆后的校验类
    at e.f.g.h(SourceFile:88)
    at okhttp3.internal.connection.RealCall.execute(...)
栈中第一个非系统类(即 a.b.c.d)就是执行校验的位置。用 jadx 打开 APK,搜索这个混淆类名,看反编译代码确认 check / verify 方法的实际签名,再针对性 Hook。
9.3 策略 C:字符串常量反向追踪(兜底,连异常都不抛时)
少数 App 会把"失败"做成无声断网而不抛异常——这时连堆栈都拿不到。借助一个事实:OkHttp 的 Pin hash 总是以 sha256/ 前缀存储,BoringSSL 错误日志里总会出现 CERTIFICATE_VERIFY_FAILED、ssl_verify_peer_cert 等固定字符串。这些字符串常量混淆器不会动(它们是编译后的字面量):
# Java 层:在 smali 中搜 sha256/ 字符串
apktool d target.apk -o target_decoded
grep -rn 'const-string.*"sha256/"' target_decoded/smali*/

# Native 层:在 SO 中搜特征字符串
strings lib/arm64-v8a/libttboringssl.so | grep -E "verify|CERT"
# 用 IDA / Ghidra 打开 SO,对找到的字符串做 X-Ref,定位调用它的函数地址
拿到字符串所在类(Java 层)或函数偏移(Native 层)后,直接按地址 Hook:
// Native 示例:假设 IDA 看到 libxxx.so 中 0x3A5678 是校验函数
var mod = Process.findModuleByName("libxxx.so");
Interceptor.attach(mod.base.add(0x3A5678), {
    onLeave: function(retval) { retval.replace(ptr(0)); }
});
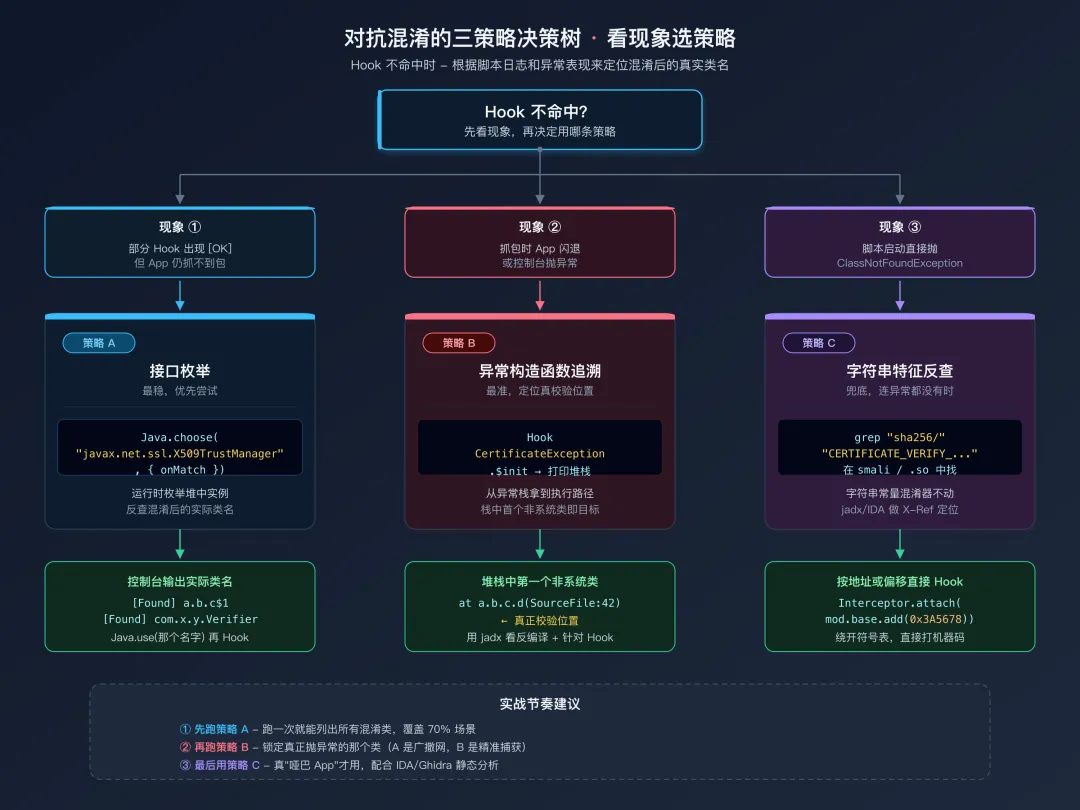
9.4 三策略的适用顺序
 对抗混淆三策略决策树
| 现象 | 优先用策略 | 备注 |
|---|
| App 加载脚本后部分日志出现,但某些 Hook 未命中 | A(接口枚举) | 通常是混淆 TrustManager |
| App 抓包时闪退或控制台抛异常 | B(异常追溯) | 顺着堆栈第一个非系统类直接打 |
| 没有任何异常但连接静默失败 | C(字符串特征) | 配合 jadx / IDA 静态分析 |
| Native 层完全没有日志 | C + 配合第七章 dlopen 监听 | 库可能被延迟加载 |
实战节奏:A 跑一次列出所有混淆类,B 跑一次定位真正抛异常的那个,两步信息合起来基本能锁定目标。C 留给真正"哑巴"的 App。
十、综合绕过脚本:一键覆盖所有层级
在实际工作中,你通常不知道 App 使用了哪一层的 Pinning。最高效的做法是加载一个综合脚本,一次性覆盖所有层级。以下脚本将前面各层的绕过整合在一起:
// ssl_bypass_all.js
// 综合 SSL Pinning 绕过脚本 - 覆盖 Java 层 + Native 层
// 用法: frida -U -f <包名> -l ssl_bypass_all.js

console.log("===========================================");
console.log("  SSL Pinning 综合绕过 v3.0");
console.log("  Java: TM / NSC / KeyStore / OkHttp /");
console.log("        Conscrypt / WebView / Cronet");
console.log("  Native: libssl / libboringssl /");
console.log("          libttboringssl / libcurl");
console.log("===========================================\n");

// 安全 Hook 包装器:每个 Hook 独立 try-catch
// 一个 Hook 失败不影响其他 Hook
function tryHook(description, hookFn) {
    try {
        hookFn();
        console.log("[OK] " + description);
    } catch(e) {
        console.log("[--] " + description + "(未检测到,跳过)");
    }
}

// ==================== Java 层 ====================
Java.perform(function() {

    // 第 1 层:TrustManager + SSLContext.init
    tryHook("TrustManager + SSLContext.init", function() {
        var X509TrustManager = Java.use("javax.net.ssl.X509TrustManager");
        var SSLContext = Java.use("javax.net.ssl.SSLContext");

        var BypassTM = Java.registerClass({
            name: "com.frida.bypass.TM",
            implements: [X509TrustManager],
            methods: {
                checkClientTrusted: function(chain, authType) {},
                checkServerTrusted: function(chain, authType) {},
                getAcceptedIssuers: function() { return []; }
            }
        });

        SSLContext.init.overload(
            "[Ljavax.net.ssl.KeyManager;",
            "[Ljavax.net.ssl.TrustManager;",
            "java.security.SecureRandom"
        ).implementation = function(km, tm, sr) {
            this.init(km, Java.array("javax.net.ssl.TrustManager",
                [BypassTM.$new()]), sr);
        };
    });

    // 第 1 层补充:Conscrypt TrustManagerImpl(系统 + 独立两套包名)
    ["com.android.org.conscrypt.TrustManagerImpl",
     "org.conscrypt.TrustManagerImpl"].forEach(function(clsName) {
        tryHook("Conscrypt: " + clsName, function() {
            var TMImpl = Java.use(clsName);
            TMImpl.verifyChain.implementation = function(untrustedChain) {
                return untrustedChain;
            };
        });
    });

    // 第 6.2 节 NetworkSecurityConfig: NetworkSecurityTrustManager
    tryHook("NetworkSecurityTrustManager (2-arg)", function() {
        var NSTM = Java.use("android.security.net.config.NetworkSecurityTrustManager");
        NSTM.checkServerTrusted.overload(
            "[Ljava.security.cert.X509Certificate;", "java.lang.String"
        ).implementation = function() {};
    });
    tryHook("NetworkSecurityTrustManager (3-arg)", function() {
        var NSTM = Java.use("android.security.net.config.NetworkSecurityTrustManager");
        NSTM.checkServerTrusted.overload(
            "[Ljava.security.cert.X509Certificate;", "java.lang.String", "java.lang.String"
        ).implementation = function() {
            return Java.use("java.util.ArrayList").$new();
        };
    });
    tryHook("RootTrustManager", function() {
        var RTM = Java.use("android.security.net.config.RootTrustManager");
        RTM.checkServerTrusted.overload(
            "[Ljava.security.cert.X509Certificate;", "java.lang.String"
        ).implementation = function() {};
    });

    // 第 6.3 节 嵌入式 KeyStore: TrustManagerFactory.init(KeyStore) -> null
    tryHook("TrustManagerFactory.init(KeyStore)", function() {
        var TMF = Java.use("javax.net.ssl.TrustManagerFactory");
        TMF.init.overload("java.security.KeyStore")
            .implementation = function(ks) { this.init(null); };
    });

    // 第 2 层:OkHttp3 CertificatePinner
    tryHook("OkHttp3 CertificatePinner", function() {
        var CP = Java.use("okhttp3.CertificatePinner");
        CP.check.overload("java.lang.String", "java.util.List")
            .implementation = function(h, c) {};
    });

    // OkHttp3 Kotlin 版本(OkHttp 4.x+)
    tryHook("OkHttp3 check$okhttp", function() {
        var CP = Java.use("okhttp3.CertificatePinner");
        CP.check$okhttp.overload(
            "java.lang.String",
            "kotlin.jvm.functions.Function0"
        ).implementation = function(h, f) {};
    });

    // OkHttp 内置 HostnameVerifier
    tryHook("OkHostnameVerifier", function() {
        var V = Java.use("okhttp3.internal.tls.OkHostnameVerifier");
        V.verify.overload("java.lang.String", "javax.net.ssl.SSLSession")
            .implementation = function() { return true; };
    });

    // 旧版 OkHttp (com.squareup.okhttp)
    tryHook("OkHttp (旧版)", function() {
        var CP = Java.use("com.squareup.okhttp.CertificatePinner");
        CP.check.overload("java.lang.String", "[Ljava.security.cert.Certificate;")
            .implementation = function(h, c) {};
    });

    // HttpsURLConnection
    tryHook("HttpsURLConnection", function() {
        var HC = Java.use("javax.net.ssl.HttpsURLConnection");
        HC.setDefaultHostnameVerifier.implementation = function(v) {};
        HC.setSSLSocketFactory.implementation = function(f) {};
    });

    // TrustKit
    tryHook("TrustKit PinningTrustManager", function() {
        var PTM = Java.use(
            "com.datatheorem.android.trustkit.pinning.PinningTrustManager");
        PTM.checkServerTrusted.implementation = function() {};
    });

    // WebView SSL 错误
    tryHook("WebViewClient SSL Error", function() {
        var WC = Java.use("android.webkit.WebViewClient");
        WC.onReceivedSslError.implementation = function(v, h, e) {
            h.proceed();
        };
    });

    // Cronet
    tryHook("Cronet", function() {
        var CE = Java.use("org.chromium.net.CronetEngine$Builder");
        CE.enablePublicKeyPinningBypassForLocalTrustAnchors
            .implementation = function(e) {
            return this.enablePublicKeyPinningBypassForLocalTrustAnchors(true);
        };
    });

    console.log("");
});

// ==================== Native 层 ====================
// 候选 SO 名列表:常见的 TLS 库都试一遍
var SSL_LIBS = ["libssl.so", "libboringssl.so", "libttboringssl.so"];

function hookNativeSSL(lib) {
    var mod = Process.findModuleByName(lib);
    if (!mod) { console.log("[--] Native: " + lib + "(未加载,跳过)"); return; }
    console.log("[OK] Native: " + lib + "  base=" + mod.base);

    // SSL_CTX_set_custom_verify(BoringSSL 专有,回调返回 0 = ok)
    var a1 = Module.findExportByName(lib, "SSL_CTX_set_custom_verify");
    if (a1) Interceptor.attach(a1, {
        onEnter: function(args) {
            args[2] = new NativeCallback(function() { return 0; },
                "int", ["pointer", "pointer"]);
        }
    });

    // SSL_CTX_set_cert_verify_callback(回调返回 1 = ok)
    var a2 = Module.findExportByName(lib, "SSL_CTX_set_cert_verify_callback");
    if (a2) Interceptor.attach(a2, {
        onEnter: function(args) {
            args[1] = new NativeCallback(function() { return 1; },
                "int", ["pointer", "pointer"]);
        }
    });

    // SSL_CTX_set_verify / SSL_set_verify -> SSL_VERIFY_NONE
    ["SSL_CTX_set_verify", "SSL_set_verify"].forEach(function(name) {
        var a = Module.findExportByName(lib, name);
        if (a) Interceptor.attach(a, {
            onEnter: function(args) { args[1] = ptr(0); args[2] = ptr(0); }
        });
    });

    // SSL_get_verify_result -> X509_V_OK
    var a3 = Module.findExportByName(lib, "SSL_get_verify_result");
    if (a3) Interceptor.attach(a3, {
        onLeave: function(rv) { if (!rv.equals(ptr(0))) rv.replace(ptr(0)); }
    });

    // ssl_verify_peer_cert(内部符号,遍历找)
    try {
        mod.enumerateSymbols().forEach(function(sym) {
            if (sym.name.indexOf("ssl_verify_peer_cert") !== -1) {
                Interceptor.attach(sym.address, {
                    onLeave: function(rv) {
                        if (rv.toInt32() !== 0) rv.replace(ptr(0));
                    }
                });
            }
        });
    } catch(e) {}
}

// 立即对已加载的库下手
SSL_LIBS.forEach(hookNativeSSL);

// 对未加载的库挂 dlopen 监听
(function() {
    var dlopenPtr = Module.findExportByName(null, "android_dlopen_ext")
                  || Module.findExportByName(null, "dlopen");
    if (!dlopenPtr) return;
    Interceptor.attach(dlopenPtr, {
        onEnter: function(args) { this.libPath = args[0].readCString(); },
        onLeave: function() {
            if (!this.libPath) return;
            for (var i = 0; i < SSL_LIBS.length; i++) {
                if (this.libPath.indexOf(SSL_LIBS[i].replace(".so", "")) !== -1) {
                    console.log("[+] dlopen 监听到 " + SSL_LIBS[i] + ",安装 Hook");
                    hookNativeSSL(SSL_LIBS[i]);
                }
            }
        }
    });
})();

// X509_verify_cert(OpenSSL 历史 API,独立处理)
tryHook("Native: X509_verify_cert", function() {
    var hooked = false;
    ["libssl.so", "libcrypto.so"].forEach(function(lib) {
        var fn = Module.findExportByName(lib, "X509_verify_cert");
        if (fn) {
            Interceptor.attach(fn, {
                onLeave: function(retval) {
                    if (retval.toInt32() !== 1) retval.replace(ptr(1));
                }
            });
            hooked = true;
        }
    });
    if (!hooked) throw new Error("not found");
});

// libcurl: curl_easy_setopt 关掉 VERIFYPEER / VERIFYHOST
tryHook("Native: libcurl curl_easy_setopt", function() {
    var fn = Module.findExportByName("libcurl.so", "curl_easy_setopt");
    if (!fn) throw new Error("not found");
    Interceptor.attach(fn, {
        onEnter: function(args) {
            var opt = args[1].toInt32();
            if (opt === 64 || opt === 81) args[2] = ptr(0);
        }
    });
});

console.log("\n[*] SSL Pinning 绕过全部加载完成");
console.log("[*] 请配合 Charles/mitmproxy 使用\n");
十一、绕过失败的排查流程
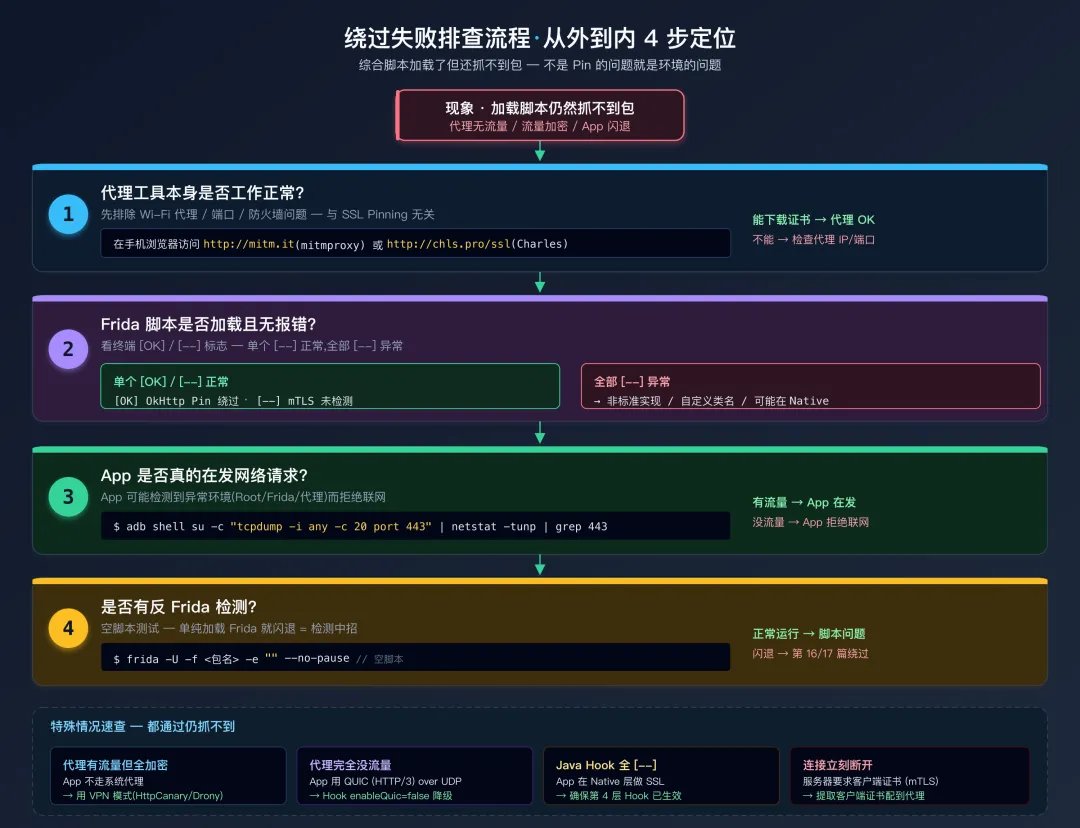
当你加载了综合绕过脚本但仍然抓不到包时,按照以下流程逐步排查。
 绕过失败排查流程
第一步,确认代理工具本身工作正常。 在手机浏览器中访问 http://mitm.it(mitmproxy)或 http://chls.pro/ssl(Charles),看是否能正常显示证书下载页面。如果不能,说明代理配置有问题(Wi-Fi 代理设置、电脑防火墙、端口冲突等),和 SSL Pinning 无关。
第二步,确认 Frida 脚本已加载且没有报错。 检查终端输出,应该看到多个 [OK] 行。如果某个关键的 Hook 显示 [--](比如 TrustManager 或 CertificatePinner),说明对应的类没有被 App 使用——这是正常的。但如果所有 Hook 都显示 [--],说明 App 可能使用了非标准的实现。
第三步,确认 App 确实在发网络请求。 在 ADB shell 中运行:
# 监控 443 端口的 TCP 流量(需要 root)
adb shell su -c "tcpdump -i any -c 20 port 443"

# 如果没有 tcpdump,可以用 netstat 查看活跃连接
adb shell netstat -tunp | grep 443
如果有 TCP 流量输出,说明 App 在尝试建立 HTTPS 连接;如果没有流量,说明 App 可能检测到了异常环境(Root/Frida/代理)而拒绝联网。
第四步,检查是否有反 Frida 检测。 尝试加载一个完全空的脚本:
frida -U -f <包名> -e "" --no-pause
看 App 是否正常运行。如果空脚本就导致 App 闪退或行为异常,说明 App 有反 Frida 检测,需要先解决检测问题(见第16篇 Root 检测绕过和第17篇 Frida 检测对抗)。
第五步,考虑特殊情况:
| 症状 | 可能原因 | 解决方案 |
|---|
| 代理有流量但全是加密的 | App 不走系统代理 | 见下方「App 不走系统代理」一节 |
| 代理完全没有流量 | App 使用 QUIC (HTTP/3) | Hook 禁用 QUIC,让 App 降级到 HTTP/2 |
| Java Hook 全部 [--] | App 在 Native 层做 SSL | 确保 Native 层 Hook 已生效(第七章) |
| 类名 ClassNotFoundException | App 做了混淆 | 见第九章对抗混淆三策略 |
| 连接建立但立刻断开 | 服务器验证客户端证书 (mTLS) | 提取客户端证书配置到代理(第八章) |
| App 闪退无任何日志 | 反 Frida 检测 | 见第 16-17 篇 |
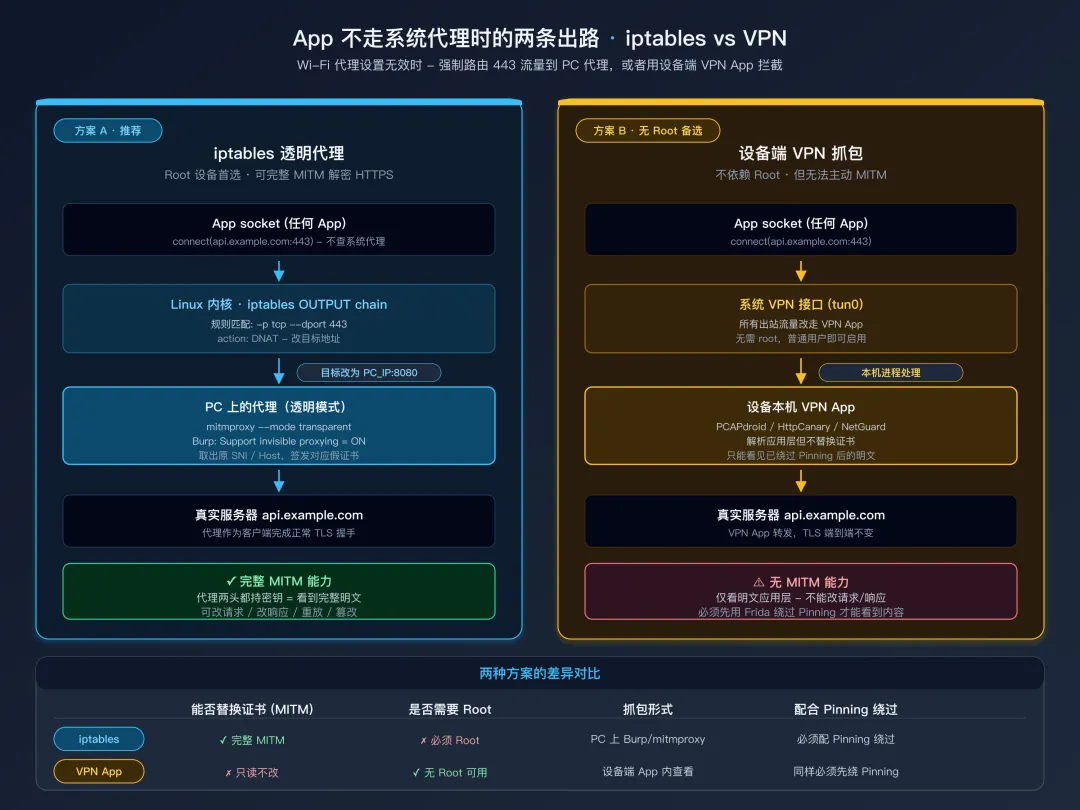
11.1 App 不走系统代理时的两条出路
部分 App(OkHttp 的 proxy(Proxy.NO_PROXY) 配置、字节系产品、自带 Native 网络库的应用)会显式绕开系统 HTTP 代理设置,Wi-Fi 代理设了也没用。两种应对思路:
A. iptables 透明代理(Root 设备首选) —— 在 Linux 网络层把 443 流量强制 DNAT 到代理机:
# 把出站 443 流量重定向到 PC 上的 Burp/mitmproxy:8080
adb shell "su -c 'iptables -t nat -A OUTPUT -p tcp --dport 443 -j DNAT --to-destination <PC_IP>:8080'"

# 清掉规则
adb shell "su -c 'iptables -t nat -F OUTPUT'"
代理工具需要开启「透明代理」模式:mitmproxy 用 mitmproxy --mode transparent,Burp 在 Proxy → Options → Request handling 勾选 "Support invisible proxying"。
B. 设备端 VPN 抓包(无 Root 备选) —— 用 HttpCanary / PCAPdroid 在设备本机起 VPN 服务,所有出网流量统一走它,不依赖系统代理设置。代价是它无法做主动 MITM,只能看明文应用层数据。
 iptables 透明代理 vs 设备端 VPN 抓包路径对比
11.2 QUIC 禁用
QUIC 基于 UDP 而不是 TCP,传统 HTTPS 代理无法拦截。如果 App 使用 Cronet 的 QUIC 支持,可以 Hook 强制关闭:
Java.perform(function() {
    try {
        var CE = Java.use("org.chromium.net.CronetEngine$Builder");
        CE.enableQuic.implementation = function(enable) {
            return this.enableQuic(false);   // 强制关 QUIC,降级到 HTTP/2
        };
    } catch(e) {}
});
十二、抓包成功后:直接在 Frida 中查看流量
绕过 SSL Pinning 后,配合 Charles/mitmproxy 抓包是标准做法。但有时候你可能只是想快速看一下 App 发了什么请求,不想启动完整的抓包工具。这时可以用 Frida 直接在 OkHttp 的请求层面捕获 HTTP 流量:
// okhttp_traffic.js - 在 SSL 绕过脚本的基础上叠加使用
// 直接在控制台打印所有 OkHttp 的 HTTP 请求和响应

Java.perform(function() {
    try {
        var RealCall = Java.use("okhttp3.RealCall");

        // Hook RealCall.execute: 同步 HTTP 请求
        RealCall.execute.implementation = function() {
            // 获取 Request 对象
            var request = this.request();
            console.log("\n[HTTP] " + request.method() + " " + request.url());

            // 打印请求头
            var headers = request.headers();
            for (var i = 0; i < headers.size(); i++) {
                console.log("  > " + headers.name(i) + ": " + headers.value(i));
            }

            // 执行原始请求
            var response = this.execute();

            // 打印响应状态
            console.log("  < " + response.code() + " " + response.message());

            // 打印响应体(使用 peekBody 避免消耗流)
            try {
                var body = response.peekBody(1024 * 512);  // 最多 512KB
                // body.string() 返回的 Java String 会被 Frida 自动 marshal 为 JS string
                // 因此用 .length 属性访问、用 .substring() 方法切片(JS 风格)
                var bodyStr = body.string();
                if (bodyStr.length > 1000) {
                    console.log("  Body: " + bodyStr.substring(0, 1000) + "...(截断)");
                } else {
                    console.log("  Body: " + bodyStr);
                }
            } catch(e) {
                console.log("  Body: (无法读取)");
            }

            return response;
        };

        console.log("[*] OkHttp 流量捕获已启动");
    } catch(e) {
        console.log("[*] OkHttp 流量捕获未启用(App 可能不使用 OkHttp)");
    }
});
peekBody vs body:response.body().string() 会消耗响应体流——调用后 App 自己再读取响应体时就会得到空数据,导致功能异常。response.peekBody(maxBytes) 是 OkHttp 提供的安全读取方法,它会缓冲指定字节数的响应体内容供你读取,但不影响 App 对原始响应体的读取。永远使用 peekBody 而非 body。
十三、工具生态速查
把本篇用到、以及实战中可能更省事的工具集中在一张表里。优先级从上到下:能解决问题的最简方案放前面。
| 工具 | 用途 | 一行命令 / 用法 | 适用场景 |
|---|
| objection | 一键绕过 | objection -g <pkg> explore → android sslpinning disable | 常规 App,先试这条 |
| frida-multiple-unpinning | 通杀脚本 | frida -U -f <pkg> -l frida-multiple-unpinning.js | 覆盖面最广的 JS 脚本 |
| Frida CodeShare | 社区脚本 | frida --codeshare <作者>/<脚本> -f <pkg> | 抖音/TikTok 等特定 App 的现成脚本 |
| HTTP Toolkit | 一键注入抓包 | 图形化「Android Device via ADB」 | 不想配 Frida 时的快速方案 |
| apk-mitm | 重打包绕过 | npx apk-mitm app.apk | 无 Root 设备,且 App 不做签名校验时 |
| PCAPdroid | 无 Root 流量捕获 | Play Store 安装 | 仅看明文应用层,不做 MITM |
| HttpCanary / ProxyDroid | 设备端 VPN/SOCKS 代理 | 设置目标 App 走它的隧道 | App 不走系统代理 |
| AlwaysTrustUserCerts (Magisk) | 系统级 CA 安装 | Magisk Manager 安装模块 | Android 7.0+ 用户 CA 默认不信任 |
| MoveCertificate (Zygisk) | 同上 | Zygisk 模块 | Android 14+ /system 只读 |
| reFlutter | Flutter SO 替换 | 重打包 APK 时注入修过的 libflutter.so | Flutter App 抓包 |
| mitmproxy + transparent | 透明代理 | mitmproxy --mode transparent 配合 iptables | Root 设备强制路由 443 |
顺序心法:先 objection 一句;不行换 frida-multiple-unpinning;再不行翻 CodeShare 找针对性脚本;最后才是按本篇的五层模型逐层手写 Hook。从「找现成的」到「自己改」到「自己写」是性价比最高的三档。
总结
这一篇系统地覆盖了 SSL Pinning 绕过的所有层级。
| 层级 | 核心 Hook 点 | 绕过原理 |
|---|
| 第1层 TrustManager | SSLContext.init | 替换 TrustManager 为空实现 |
| 第2层 OkHttp | CertificatePinner.check | 空实现不抛异常 = 校验通过 |
| 第3层 平台 | TrustManagerImpl.verifyChain | 直接返回未验证证书链 |
| 第4层 Native | SSL_CTX_set_custom_verify 等 | 替换回调 / 强制返回成功 |
| 第5层 mTLS | KeyStore.load | 提取证书密码配置到代理 |
实战要诀:
- 先试第二章通用方案,不行再走五层模型分析
- 「系统 CA + Frida 绕过」双管齐下覆盖率最高
- 绕过失败时按第十一章排查流程逐步定位(代理 → 脚本 → 流量 → 反检测 → 特殊协议)
- 类名混淆走第九章三策略,Native 延迟加载走第七章 dlopen 监听
- Flutter App 需要额外处理
libflutter.so / 抖音系走 libttboringssl.so 专项(第 7.5 节)

