基于YOLOv11的安全帽佩戴检测算法
点击下方卡片,关注“人工智能陈小白”
视觉/大模型/图像重磅干货,第一时间送达!
前言
安全帽佩戴检测是工业安全领域的一项关键任务。无论是在建筑工地、工厂还是其他高危作业场所,确保工作人员佩戴安全帽是保护生命安全的基本要求。传统的人工巡查方式效率低下且容易出现遗漏,而基于深度学习的自动检测系统可以实时、准确地监测工作人员的安全帽佩戴情况。
本文基于YOLOv11算法框架,详细介绍了安全帽佩戴检测系统的设计与实现全过程,包括数据准备、模型训练、性能评估等关键环节。通过实际项目案例,展示了如何训练目标检测算法。
1、系统概述
1.1 系统目标
本系统旨在构建一个实时、准确的安全帽佩戴检测算法,能够:
- • 实时处理:支持视频流和图像的实时检测,满足工地实时监控需求
- • 高准确率:在复杂场景下保持较高的检测准确率,减少误检和漏检
1.2 核心特点
| |
| 算法 | |
| 框架 | |
| 输入尺寸 | |
| 推理速度 | |
| 准确率指标 | mAP@0.5 |
| 部署支持 | |
2、需求分析
2.1 功能需求
- • 目标类别(helmet/head/person)
2.2 非功能需求
3、技术方案
3.1 为什么选择YOLOv11?
3.2 系统架构
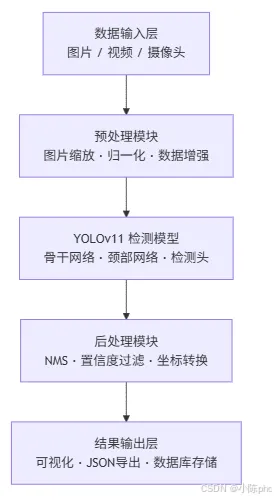
3.3 技术栈
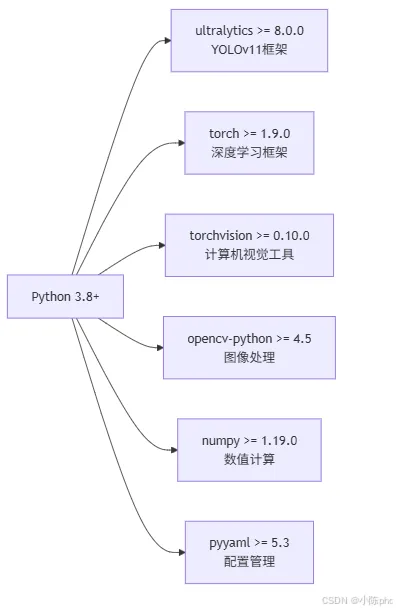
4、数据准备
4.1 数据集概况
本项目使用了包含5000张工地作业人员图片的数据集,具体统计如下:
类别分布
数据集包含三个检测类别:
4.2 数据格式转换
原始数据采用Pascal VOC格式(XML标注),需要转换为YOLO格式(TXT标注)。
Pascal VOC格式示例
<?xml version="1.0" encoding="UTF-8"?><annotation><filename>hard_hat_workers0001.png</filename><size><width>1920</width><height>1080</height></size><object><name>helmet</name><bndbox><xmin>100</xmin><ymin>50</ymin><xmax>250</xmax><ymax>300</ymax></bndbox></object><object><name>head</name><bndbox><xmin>500</xmin><ymin>100</ymin><xmax>650</xmax><ymax>350</ymax></bndbox></object></annotation>
YOLO格式说明
<class_id> <x_center> <y_center> <width> <height>其中:- class_id: 类别ID (0-2)- x_center, y_center: 目标中心点的相对坐标 (归一化到0-1)- width, height: 目标宽高的相对尺寸 (归一化到0-1)
YOLO格式示例:
0 0.345 0.210 0.208 0.2901 0.725 0.350 0.185 0.3152 0.500 0.500 0.300 0.400
4.3 数据集划分
数据集按以下比例划分为训练集、验证集和测试集:
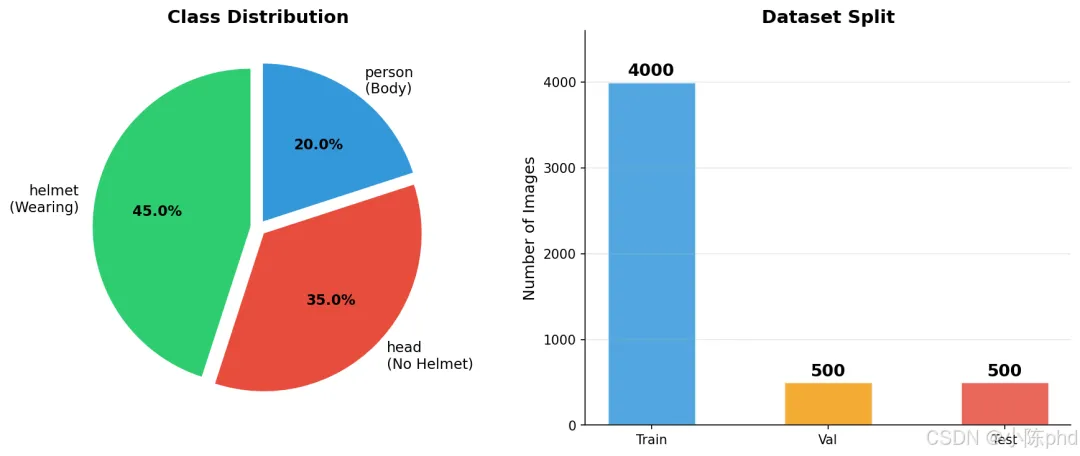
转换脚本实现
defconvert_dataset(dataset_dir, output_dir, train_ratio=0.8, val_ratio=0.1):""" 转换数据集为YOLO格式 划分: 训练集80%, 验证集10%, 测试集10% """# 1. 解析XML标注文件for xml_file in annotation_files: annotation = parse_xml(xml_file)# 2. 将Pascal VOC坐标转换为YOLO格式 yolo_lines = convert_to_yolo_format(annotation)# 3. 保存为TXT文件 save_yolo_annotation(yolo_lines, output_path)# 4. 划分数据集 train_files, temp_files = split(image_files, train_ratio) val_files, test_files = split(temp_files, val_ratio/(1-train_ratio))# 5. 生成data.yaml配置文件 create_data_yaml(output_dir)
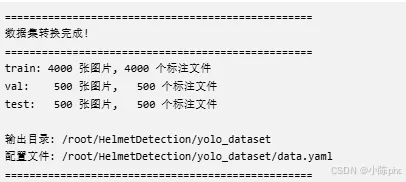
4.4 数据统计分析
通过分析转换后的数据集,获得如下统计信息:
4.5 数据质量验证
可视化样本验证
通过随机可视化样本来检查数据标注的准确性:
defvisualize_random_samples(dataset_dir, output_dir, num_samples=20):"""随机可视化样本用于质量检查"""# 随机选择样本 samples = random.sample(image_files, num_samples)# 绘制边界框for img_path in samples: img = cv2.imread(img_path) annotation = parse_xml(xml_path)# 绘制目标框for obj in annotation['objects']: x1, y1, x2, y2 = obj['bbox'] cv2.rectangle(img, (x1, y1), (x2, y2), color, 2)# 保存可视化结果 cv2.imwrite(save_path, img)
验证结果示例
已生成可视化样本,包括:
4.6 data.yaml配置文件
# 安全帽检测数据集path:/root/HelmetDetection/yolo_dataset# 数据集根目录train:images/train# 训练集图片路径val:images/val# 验证集图片路径test:images/test# 测试集图片路径# 类别names:0:helmet# 佩戴安全帽1:head# 未佩戴安全帽2:person# 人# 类别数量nc:3
5、模型训练
5.1 训练环境配置
硬件配置
GPU: NVIDIA RTX 3090 (48GB 显存)CPU: Intel Xeon 处理器内存: 128GB RAM存储: SSD 高速存储
软件环境
CUDA: 11.8cuDNN: 8.7Python: 3.10PyTorch: 2.0+
5.2 模型选择
选择YOLOv11n(纳米级模型)的理由:
对于工地应用,选择YOLOv11n能够:
5.3 训练配置详解
核心超参数
results = model.train(# 数据配置 data='/root/HelmetDetection/yolo_dataset/data.yaml',# 训练基础配置 epochs=300, # 总训练轮数 imgsz=640, # 输入图片尺寸(单位:像素) batch=64, # 批次大小(batch size) workers=16, # 数据加载线程数 device=0, # GPU设备ID# 优化器配置 optimizer='SGD', # 优化器选择 lr0=0.01, # 初始学习率 lrf=0.01, # 最终学习率比例 momentum=0.937, # SGD动量参数 weight_decay=0.0005, # L2正则化系数# 学习率调度 cos_lr=True, # 使用余弦学习率衰减# 其他配置 patience=20, # 早停耐心值(验证集不改进轮数) save_period=10, # 每10轮保存一次检查点 amp=True, # 自动混合精度训练)
参数详解
| | |
| epochs | | |
| imgsz | | |
| batch | | |
| lr0 | | |
| momentum | | |
| weight_decay | | |
| patience | | |
| cos_lr | | |
| amp | | |
5.4 数据增强策略
# 数据增强配置hsv_h=0.015, # HSV色调增强幅度hsv_s=0.7, # HSV饱和度增强幅度hsv_v=0.4, # HSV亮度增强幅度degrees=0.0, # 旋转增强(本项目不使用)translate=0.1, # 平移增强:±10%scale=0.5, # 缩放增强:±50%shear=0.0, # 剪切增强(本项目不使用)perspective=0.0, # 透视变换增强(本项目不使用)flipud=0.0, # 上下翻转(本项目不使用)fliplr=0.5, # 左右翻转:50%概率mosaic=1.0, # Mosaic增强:100%启用mixup=0.0, # Mixup增强(本项目不使用)copy_paste=0.0, # Copy-paste增强(本项目不使用)
增强效果说明
5.5 训练过程监控
关键指标
训练损失 (Train Loss)├── Box Loss: 边界框位置损失├── Cls Loss: 分类损失└── DFL Loss: 分布焦点损失验证指标 (Val Metrics)├── mAP@0.5: IoU=0.5时的平均精度├── mAP@0.75: IoU=0.75时的平均精度├── mAP@0.5:0.95: IoU从0.5到0.95的平均精度├── Precision: 精确率├── Recall: 召回率└── F1-Score: F1得分
5.6 训练脚本使用
运行训练
# 方法1:直接运行脚本python train_yolo.py --mode train# 方法2:使用Python调用from train_yolo import train_helmet_detectorresults = train_helmet_detector()
完整的训练流程
deftrain_helmet_detector():""" 训练安全帽检测模型 """# 1. 加载预训练模型 model = YOLO('/root/HelmetDetection/yolo11n.pt')# 2. 执行训练 results = model.train( data='/root/HelmetDetection/yolo_dataset/data.yaml', epochs=300, imgsz=640, batch=64,# ... 其他参数 )# 3. 输出结果print(f"最佳模型: {results.best}")return results
6、性能评估
6.1 评估指标详解
平均精度 (Average Precision, AP)
AP = ∫ P(r) dr (从 r=0 到 r=1)其中:P(r) = TP / (TP + FP) - 精确率r = TP / (TP + FN) - 召回率mAP = (AP_class1 + AP_class2 + ... + AP_classN) / N
mAP@0.5 vs mAP@0.5:0.95
| | |
| mAP@0.5 | | |
| mAP@0.75 | | |
| mAP@0.5:0.95 | | |
7、模型优化
7.1 模型导出与格式转换
支持的导出格式
# 导出为不同格式model = YOLO('best.pt')# PyTorch格式model.export(format='pt') # PyTorch格式# ONNX格式 (跨平台)model.export(format='onnx', imgsz=640, dynamic=True) # 支持动态尺寸# TensorRT格式 (NVIDIA GPU加速)model.export(format='engine', # TensorRT引擎 imgsz=640, half=True) # 半精度加速# CoreML格式 (iOS部署)model.export(format='coreml')# OpenVINO格式 (Intel设备)model.export(format='openvino')
导出过程代码
defexport_model():""" 导出模型为不同格式 """ model = YOLO('/root/HelmetDetection/runs/helmet_detection/weights/best.pt')# 1. 导出ONNX格式print("\n导出ONNX格式...") model.export(format='onnx', imgsz=640, dynamic=True)# 输出: best.onnx (可用于C++、Java等语言调用)# 2. 导出TensorRT格式print("\n导出TensorRT格式...")try: model.export(format='engine', imgsz=640, half=True)# 输出: best.engine (GPU推理加速)except Exception as e:print(f"TensorRT导出失败: {e}")
7.2 量化与加速
INT8量化
# TensorRT INT8量化model.export(format='engine', imgsz=640, half=False, # 不使用半精度 int8=True) # 启用INT8量化
效果:
半精度(FP16)推理
model = YOLO('best.pt')results = model.predict( source='image.jpg', half=True, # 使用半精度 imgsz=640)
效果:
7.3 批量推理优化
# 批量处理多张图片images = ['img1.jpg', 'img2.jpg', 'img3.jpg', ...]results = model.predict( source=images, batch=32, # 批量推理 device=0, conf=0.65, iou=0.5)# 结果处理for result in results: boxes = result.boxesfor box in boxes: x1, y1, x2, y2 = box.xyxy[0] confidence = box.conf[0] class_id = box.cls[0]
8、部署与应用
8.1 单图片检测
from ultralytics import YOLO# 加载模型model = YOLO('/root/HelmetDetection/runs/helmet_detection/weights/best.pt')# 检测单张图片results = model.predict( source='worker_image.jpg', conf=0.65, # 置信度阈值 imgsz=640)# 获取结果result = results[0]boxes = result.boxesfor box in boxes: x1, y1, x2, y2 = box.xyxy[0] confidence = box.conf[0] class_id = int(box.cls[0]) class_name = model.names[class_id]print(f"类别: {class_name}, 置信度: {confidence:.2%}")print(f"坐标: ({x1:.0f}, {y1:.0f}, {x2:.0f}, {y2:.0f})")
8.2 视频检测
import cv2from ultralytics import YOLOmodel = YOLO('best.pt')# 打开视频文件或摄像头cap = cv2.VideoCapture('video.mp4') # 或 0 表示摄像头whileTrue: ret, frame = cap.read()ifnot ret:break# 检测 results = model.predict(source=frame, conf=0.65, verbose=False)# 绘制结果 annotated_frame = results[0].plot()# 显示 cv2.imshow('Helmet Detection', annotated_frame)if cv2.waitKey(1) & 0xFF == ord('q'):breakcap.release()cv2.destroyAllWindows()
8.3 实时摄像头监控
import cv2from ultralytics import YOLOfrom datetime import datetimeclassHelmetDetector:def__init__(self, model_path):self.model = YOLO(model_path)self.class_names = {0: 'helmet', 1: 'head', 2: 'person'}defdetect_violations(self, frame, conf=0.65):""" 检测安全帽违规情况 """ results = self.model.predict(source=frame, conf=conf, verbose=False) result = results[0] violations = []for box in result.boxes: x1, y1, x2, y2 = box.xyxy[0] class_id = int(box.cls[0]) confidence = float(box.conf[0])# 检测到未佩戴安全帽的人员if class_id == 1: # head类 violations.append({'type': 'no_helmet','box': (int(x1), int(y1), int(x2), int(y2)),'confidence': confidence,'time': datetime.now().isoformat() })return violations, resultdefdraw_results(self, frame, result, violations):""" 绘制检测结果 """ annotated = result.plot()# 在未佩戴安全帽的人员周围绘制红色警告框for violation in violations: x1, y1, x2, y2 = violation['box'] cv2.rectangle(annotated, (x1, y1), (x2, y2), (0, 0, 255), 3) cv2.putText(annotated, 'WARNING: NO HELMET', (x1, y1-10), cv2.FONT_HERSHEY_SIMPLEX, 0.9, (0, 0, 255), 2)return annotated# 使用示例detector = HelmetDetector('best.pt')cap = cv2.VideoCapture(0)whileTrue: ret, frame = cap.read()ifnot ret:break violations, result = detector.detect_violations(frame, conf=0.65) annotated = detector.draw_results(frame, result, violations)# 显示违规数量 cv2.putText(annotated, f'Violations: {len(violations)}', (10, 30), cv2.FONT_HERSHEY_SIMPLEX, 1, (0, 0, 255), 2) cv2.imshow('Helmet Detection', annotated)if cv2.waitKey(1) & 0xFF == ord('q'):breakcap.release()cv2.destroyAllWindows()
8.4 Web服务部署
使用FastAPI构建REST API服务:
from fastapi import FastAPI, File, UploadFilefrom ultralytics import YOLOimport cv2import numpy as npimport iofrom PIL import Imageapp = FastAPI(title="Helmet Detection API")model = YOLO('best.pt')@app.post("/detect")asyncdefdetect_helmet(file: UploadFile = File(...)):""" 检测上传图片中的安全帽 """# 读取上传的图片 contents = await file.read() nparr = np.frombuffer(contents, np.uint8) img = cv2.imdecode(nparr, cv2.IMREAD_COLOR)# 运行检测 results = model.predict(source=img, conf=0.65) result = results[0]# 提取检测结果 detections = []for box in result.boxes: x1, y1, x2, y2 = box.xyxy[0] class_id = int(box.cls[0]) confidence = float(box.conf[0]) detections.append({'class': model.names[class_id],'confidence': confidence,'bbox': {'x1': float(x1), 'y1': float(y1), 'x2': float(x2), 'y2': float(y2)} })return {'filename': file.filename,'detections': detections,'total_detections': len(detections) }@app.get("/health")asyncdefhealth():return {"status": "ok"}# 启动服务: uvicorn main:app --reload
8.5 Docker容器部署
FROM ultralytics/yolov5:latestWORKDIR /app# 复制模型和应用代码COPY best.pt /app/COPY app.py /app/COPY requirements.txt /app/RUN pip install -r requirements.txtEXPOSE8000CMD ["python", "app.py"]
部署命令:
# 构建镜像docker build -t helmet-detector:latest .# 运行容器docker run -d -p 8000:8000 helmet-detector:latest# 测试APIcurl -X POST -F "file=@test.jpg" http://localhost:8000/detect
九、总结与展望
9.1 项目成果总结
| |
| 准确率 | mAP@0.5 |
| 推理速度 | |
| 模型大小 | |
| 训练时间 | |
| 部署支持 | |
9.2 主要特点
✅ 高精度:三个类别均达到98%以上的准确率✅ 高效率:实时视频处理,满足工地监控需求✅ 易部署:支持多种硬件平台和部署方式✅ 可扩展:支持进一步优化和定制
9.3 应用场景
9.4 改进方向
- • 尝试更大的模型(YOLOv11m/l)提升精度
9.5 未来研究方向
多任务学习
同时检测:
# 伪代码:多任务输出results = model.predict(source=image)helmet_detection = results['helmet']reflective_vest = results['vest']safety_shoes = results['shoes']posture = results['posture']
3D检测与跟踪
# 集成深度学习和3D检测from ultralytics import YOLOmodel = YOLO('best.pt')depth_model = load_depth_model()results = model.predict(source=video)depth_map = depth_model.predict(source=video)# 3D位置重构for detection in results: pos_2d = detection.boxes.xyxy depth = extract_depth(depth_map, pos_2d) pos_3d = project_to_3d(pos_2d, depth)
异常行为检测
# 长期跟踪与行为分析from collections import dequeclassBehaviorAnalyzer:def__init__(self):self.track_history = deque(maxlen=30) # 保留30帧历史defanalyze_behavior(self, detection):# 检测是否有人员摘下安全帽ifself.switched_from_helmet_to_head():return"ALERT: Helmet removed!"# 检测是否有人员奔跑或摔倒ifself.detect_fall():return"ALERT: Worker fell!"
9.6 资源下载
项目所有资源已保存在 /root/HelmetDetection/ 目录:
项目目录结构:├── yolo11n.pt # 预训练权重├── train_yolo.py # 训练脚本├── convert_to_yolo.py # 数据格式转换├── yolo_dataset/ # YOLO格式数据集├── runs/helmet_detection/ # 训练输出结果│ ├── weights/best.pt # 最佳模型权重│ ├── results.csv # 训练曲线数据│ └── ...└── visualization/ # 可视化结果
9.7 引用与致谢
本项目基于以下开源框架和库:
- • Ultralytics YOLO: https://github.com/ultralytics/ultralytics
- • PyTorch: https://pytorch.org/
- • OpenCV: https://opencv.org/
附录:快速入门指南
A. 环境配置
# 1. 创建虚拟环境python -m venv helmet_envsource helmet_env/bin/activate # Linux/Mac# 或helmet_env\Scripts\activate # Windows# 2. 安装依赖pip install -r requirements.txt# 或手动安装pip install ultralytics torch torchvision opencv-python numpy pyyaml
B. 快速开始
# 1. 数据转换 (如果需要)python convert_to_yolo.py# 2. 训练模型python train_yolo.py --mode train# 3. 验证模型python train_yolo.py --mode val# 4. 导出模型python train_yolo.py --mode export# 5. 检测python -c "from ultralytics import YOLOmodel = YOLO('runs/helmet_detection/weights/best.pt')results = model.predict(source='image.jpg')"
C. 常见问题
Q: 如何加快训练速度?A:
Q: 显存不足怎么办?A:
Q: 如何提升检测精度?A:
参考资源
- • YOLOv11 官方文档: https://docs.ultralytics.com/
- • COCO 数据集: https://cocodataset.org/
- • 目标检测综述: https://arxiv.org/abs/2012.12556
感谢您的阅读!如有任何疑问,欢迎沟通交流。