碎碎念:大家好,我又来了,租的服务器快要到期了,实验室今年新买的服务器,我需要紧急把所有的环境都迁移过去,于是,我就来临时抱佛脚一下singularity。什么是容器:容器技术是一种以应用软件为中心的虚拟化技术。以应用软件为单元,将软件及所有的依赖打包成容器镜像,打包后的容器镜像可直接拷贝到不同的 Linux 主机上运行。通过容器技术,可以很好的解决安装软件时,依赖库的安装问题、软件环境的隔离以及软件环境的移植问题。使用容器的优点:容器简化了软件安装和管理;可以在一台机器上构建映像并在另一台机器上运行它;容器的版本控制和冻结使数据具有可重复性。什么是singularity:Singularity 为劳伦斯伯克利国家实验室开发专门用于高性能计算场景的容器技术,Singularity 完全基于可移植性进行虚拟化,更加轻量级,部署更快,Singularity 目前被广泛地各高性能计算中心。Singularity容器的优点:不需要 sudo 权限即可运行(与 Docker 不同);在多节点环境中与SLURM管理器很好地互操作;一个镜像文件可以在每个节点创建一个容器实例并行计算;默认情况下,轻松利用集群或服务器上的 GPU、高速网络、并行文件系统;能够将 Docker 镜像转换为 Singularity。与docker相比singularity的优势:Docker镜像并不安全,因为它们提供了一种获得对其运行的系统的root访问权限的方法。因此,Docker在集群1不可用,仅在集群2提供了web访问和使用。 singularity分为三个不同的项目(singularity、singularityCE和singularity)。目前两个集群提供singularity使用。 singularity是Docker的一种替代方案,它既安全又专为高性能计算而设计。singularity与所有Docker镜像兼容,可以与GPU和MPI应用程序一起使用。#在Unbuntu或Debian上安装以下依赖$ sudo apt-get update && sudo apt-get install -y \ build-essential \ uuid-dev \ libgpgme-dev \ squashfs-tools \ libseccomp-dev \ wget \ pkg-config \ git \ cryptsetup-bin#singularity v3主要由Go编写,需要从Go1.13或者安装更高版本以从源代码编译$ export VERSION=1.14.12 OS=linux ARCH=amd64 && \ wget https://dl.google.com/go/go$VERSION.$OS-$ARCH.tar.gz && \ sudo tar -C /usr/local -xzvf go$VERSION.$OS-$ARCH.tar.gz && \ rm go$VERSION.$OS-$ARCH.tar.gz# 然后为Go搭建环境$ echo 'export GOPATH=${HOME}/go' >> ~/.bashrc && \ echo 'export PATH=/usr/local/go/bin:${PATH}:${GOPATH}/bin' >> ~/.bashrc && \ source ~/.bashrc# 下载安装singularity$ export VERSION=3.7.0 && # adjust this as necessary \ wget https://github.com/hpcng/singularity/releases/download/v${VERSION}/singularity-${VERSION}.tar.gz && \ tar -xzf singularity-${VERSION}.tar.gz && \ cd singularity # 检查下载是否完整 $ git clone https://github.com/hpcng/singularity.git && \ cd singularity && \ git checkout v3.7.0 # 编译 $ ./mconfig && \ make -C ./builddir && \ sudo make -C ./builddir install
安装过程参考(https://docs.sylabs.io/guides/3.7/admin-guide/installation.html)- singularity快速上手使用(以blast为例):
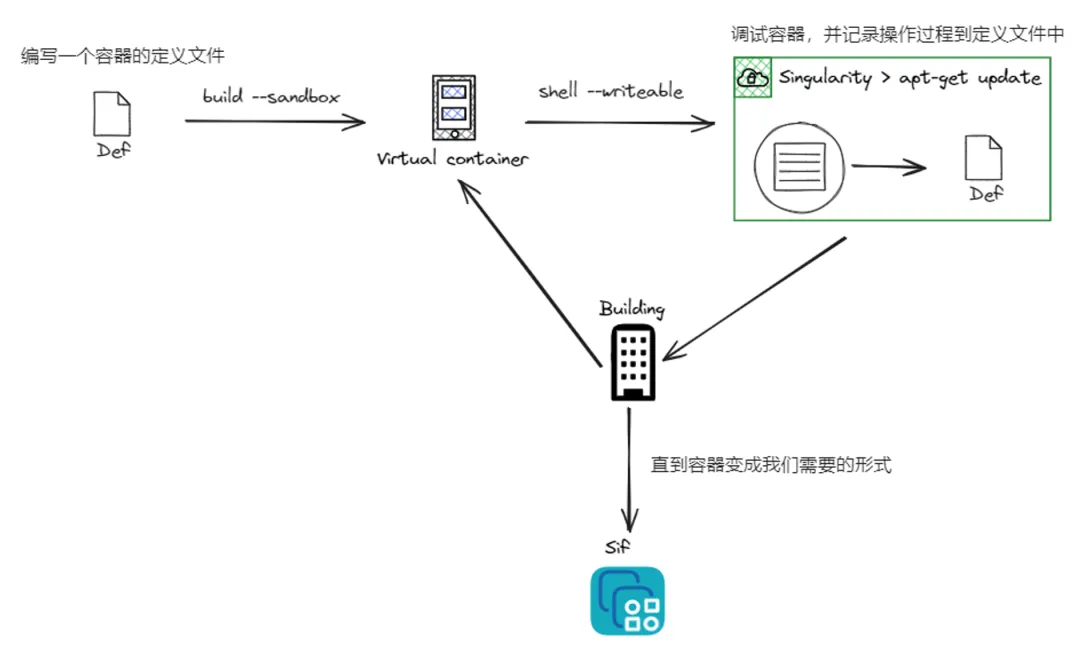
# 下载基础镜像singularity
pull
‑‑arch
amd64
library://library/default/ubuntu:20.04# 创建沙箱singularity
build
‑‑sandbox
blast
ubuntu_20.04.sif# 进入容器,在容器内安装软件singularity
shell
‑‑writable
‑‑fakeroot
blast #建议装在/opt下,手动安装,不用安装,不用conda,保持轻量#加-f(--fakeroot)参数是一个虚拟的root用户,仅容器内有效# 默认会自动在容器内创建一个与host完全一致的用户apt updateapt install wgetcd /opt/wget http://opengene.org/fastp/fastpchmod a+x ./fastppwd # 查看当前所处的文件夹exit # 退出当前环境 # 修改environment文件 vi blast/environment # 以下为文件内部内容的修改 #!/bin/sh # Custom environment shell code should follow export PATH=/opt:$PATH :wq # 保存并退出文件 # 打包 singularity
build
-f fastp.sif
blast/# 程序运行singularity exec fastp.sif fastp \ -i raw_data/1_1.fq.gz \ -I raw_data/1_2.fq.gz \ -o clean_data/1_1.fq.gz \ -O clean_data/1_2.fq.gz \ --html logs/1.html \ --json logs/1.json \ 1>logs/6-1_fastp.log 2>&1
#从Container Library
https://cloud.sylabs.io/library
singularity
pull
library://cenat/default/blast.sif:latest#从DockerHub
https://hub.docker.com
singularity
pull
docker://ncbi/blast
# 方法1:交互式运行$
singularity
shell
fastp.sif
bash
Singularity>
fastp# 方法2:直接运行$ singularity
exec
fastp.sif
fastp# 方法3:作为服务运行# 启动一个instancesingularity
instance
start
fastp.sif
fastp# 查看已启动的instancesingularity
instance
list# 运行instance里的程序singularity
exec
instance://fastp fastp -i raw_data/1_1.fq.gz -I raw_data/1_2.fq.gz -o clean_data/1_1.fq.gz -O clean_data/1_2.fq.gz --html logs/1.html --json logs/1.json 1>logs/1_fastp.log 2>&1
#默认会自动挂载$HOME,
$PWD
,
/tmp
,
/proc
,
/sys
,
/dev目录
#--bind 手动挂载#将/pub/software挂载到/mntsingularity
shell
‑‑bind
/pub/database:/mnt
fastp.sif#将/pub/database挂载到/pub/databasesingularity
shell
‑‑bind
/pub/database
fastp.sif
https://hpc.scut.edu.cn/docs/software/basic/singularity.html
https://scc.bupt.edu.cn/docs/zh/manual/singularity
https://blog.csdn.net/ZhrSyd/article/details/147786325
https://hpc.pku.edu.cn/ug/guide/soft/singularity/
https://github.com/supermanhuyu/singularity-chinese-doc/blob/master/00-singulairty%E5%BF%AB%E9%80%9F%E5%85%A5%E9%97%A8.md
https://docs.sylabs.io/guides/3.7/admin-guide/installation.html
 10个月宝宝每天需要喝多少奶粉?
