本篇目标:系统掌握 Frida 在 Native 层的全部核心 API。第05篇讲完了 Java 层的工具箱,本篇进入 Native 层。Native 层的 Frida API 围绕三个核心概念展开:NativePointer(一切数据的基础载体)、Memory(读、写、搜索、分配内存)、Interceptor(拦截和替换函数)。掌握了这些,你就拥有了在目标进程中「读任何数据、改任何数据、截获任何函数」的完整能力。
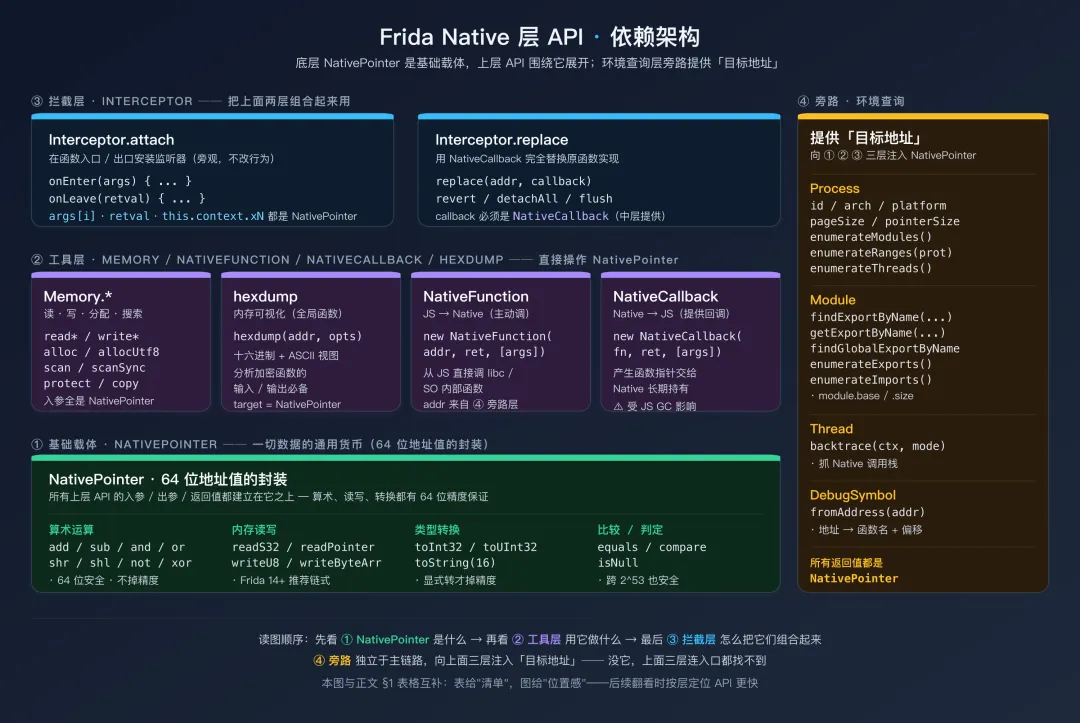
一、Native 层 API 全景图
先看全局。Frida 的 Native 层 API 按功能分为五组:
| | |
|---|
| 指针与数值 | NativePointer | |
| NativeFunction | |
| NativeCallback | 创建可被 Native 代码调用的 JS 回调函数 |
| ptr(value) | |
| NULL | |
| 内存操作 | Memory.read* | |
| Memory.alloc(size) | |
| Memory.allocUtf8String(str) | |
| Memory.scan(addr, size, pattern, callbacks) | |
| Memory.scanSync(addr, size, pattern) | |
| Memory.copy(dst, src, n) | |
| Memory.protect(addr, size, prot) | |
| hexdump(target, options) | |
| 函数拦截 | Interceptor.attach(addr, callbacks) | |
| Interceptor.replace(addr, replacement) | |
| Interceptor.revert(addr) | |
| Interceptor.detachAll() | |
| Interceptor.flush() | |
| 进程与模块 | Process.id / Process.arch / Process.platform | |
| Process.enumerateModules() | |
| Process.enumerateRanges(prot) | |
| Process.findModuleByName(name) | |
| Process.getModuleByName(name) | |
| Module.findExportByName(mod, name) | |
| Module.enumerateExports() | |
| Module.enumerateImports() | |
| 线程与调试 | Thread.backtrace(ctx, backtracer) | |
| DebugSymbol.fromAddress(addr) | |
| Process.enumerateThreads() | |
表给"清单",下面这张图给"位置感"——5 类 API 不是平的,而是分四层依赖:
Frida Native 层 API 的四层依赖架构:底层 NativePointer 是基础载体,中层是 Memory/NativeFunction/NativeCallback/hexdump 工具,上层是 Interceptor.attach/replace 拦截器,旁路是 Process/Module/Thread/DebugSymbol 环境查询层本篇的定位是:把每个 API 讲透,让你在后续实战中知道该用什么工具、怎么用。
二、NativePointer:Native 世界的通用货币
2.1 什么是 NativePointer
在 Java 层,你操作的是有类型的对象——String、int、byte[],Frida 会自动做类型转换。在 Native 层,一切都回归到最原始的形式:内存地址和字节。
NativePointer 是 Frida 对「64 位整数值」的封装。它可以代表一个内存地址(比如 0x7a8b004a90),也可以代表一个普通的整数值(比如函数的 int 参数)。在 Interceptor.attach 的 args 数组中,每个元素都是 NativePointer;retval 也是 NativePointer。
类比理解:如果说 Java 层的 Frida 像在用高级语言操作数据库(有 ORM、有类型映射、有自动转换),那 Native 层的 Frida 就像在用 C 语言直接操作裸内存——你拿到的每个值都是一个「地址/数字」,需要你自己决定如何解读它。
2.2 创建 NativePointer
// 方式一:new NativePointer(value)
var p1 = new NativePointer("0x7a8b004a90");   // 从十六进制字符串
var p2 = new NativePointer(42);                // 从整数
var p3 = new NativePointer("0");               // 空指针

// 方式二:ptr(value) —— 简写,最常用
var p4 = ptr("0x7a8b004a90");
var p5 = ptr(42);
var p6 = ptr(0);

// 方式三:NULL 常量
var p7 = NULL;   // 等同于 ptr(0)

// 从其他 API 获取(最常见的来源)
var addr = Module.findExportByName("libc.so", "open");   // 返回 NativePointer
var base = Process.findModuleByName("libnative.so").base; // 返回 NativePointer
2.3 算术运算
NativePointer 支持地址算术——这在计算偏移、遍历数组、访问结构体字段时必不可少:
var base = ptr("0x7a8b000000");

// 加法:计算偏移后的地址
var func1 = base.add(0x1A3C);      // 0x7a8b000000 + 0x1A3C = 0x7a8b001a3c
var func2 = base.add(0x4A8C);      // 0x7a8b000000 + 0x4A8C

// 减法:计算两个地址之间的距离
var distance = func2.sub(func1);    // 两个函数之间的偏移差

// 与运算:地址对齐
var aligned = ptr("0x7a8b001a3f").and(ptr("0xFFFFFFFFFFFFF000"));
// 按 4KB 页对齐 → 0x7a8b001000

// 或运算
var combined = ptr("0x100").or(ptr("0x0F"));   // 0x10F

// 右移
var pageIndex = ptr("0x7a8b001000").shr(12);   // 页号

// 比较
var isNull = addr.isNull();                    // 是否为空指针
var isEqual = addr.equals(ptr("0x7a8b001a3c")); // 两个地址是否相等
var cmp = addr.compare(ptr("0x7a8b002000"));   // 比较大小(返回 -1/0/1)
常见场景:在 IDA 中你看到一个结构体的字段布局是 offset 0x00: int type; offset 0x04: int size; offset 0x08: char* data;。用 Frida 读取时就是 Memory.readInt(structPtr.add(0x00))、Memory.readInt(structPtr.add(0x04))、Memory.readPointer(structPtr.add(0x08))——每次 .add(offset) 都是 NativePointer 的算术运算。
2.4 类型转换
NativePointer 本质上是一个 64 位整数,你需要根据上下文把它转换为合适的类型:
var p = ptr("0x7FFFFFFF");

// 转为 JavaScript 数字
var int32 = p.toInt32();     // 作为有符号 32 位整数:2147483647
var uint32 = p.toUInt32();   // 作为无符号 32 位整数:2147483647

// 转为字符串
var hexStr = p.toString();     // "0x7fffffff"
var hexStr16 = p.toString(16); // "7fffffff"(不带 0x 前缀)
var decStr = p.toString(10);   // "2147483647"(十进制)

// 在 ARM64 上获取完整 64 位值
// toInt32() / toUInt32() 只取低 32 位,对于大地址会丢失高位
// 使用 toString(16) 然后手动解析是处理 64 位值的安全方式
var fullAddr = p.toString(16); // "7fffffff"
64 位精度陷阱:JavaScript 的 Number 类型只能精确表示 2^53 以内的整数。ARM64 的地址空间是 64 位的,地址值可能超过 2^53。因此,永远不要用 parseInt(ptr.toString(), 16) 来获取地址的数值——对于大地址会丢失精度。如果需要比较两个地址,用 .equals() 或 .compare();如果需要做算术,用 .add() / .sub()。它们内部都是用 64 位整数运算的,不经过 JavaScript Number。
2.5 通过 NativePointer 读写内存
NativePointer 对象自身就提供了读写内存的快捷方法——和 Memory.read*/write* 等价,但语法更链式化:
var addr = ptr("0x7a8b001000");

// 读取
var byteVal  = addr.readU8();          // 读 1 字节无符号
var shortVal = addr.readU16();         // 读 2 字节无符号
var intVal   = addr.readS32();         // 读 4 字节有符号
var longVal  = addr.readU64();         // 读 8 字节无符号(返回 UInt64 对象)
var floatVal = addr.readFloat();       // 读 4 字节浮点
var dblVal   = addr.readDouble();      // 读 8 字节双精度浮点
var ptrVal   = addr.readPointer();     // 读取一个指针值
var str      = addr.readUtf8String();  // 读取 NULL 结尾的 UTF-8 字符串
var strN     = addr.readUtf8String(32);// 最多读 32 字节
var wstr     = addr.readUtf16String(); // 读取 UTF-16 字符串(Java 内部、Windows API 常用)
var buf      = addr.readByteArray(16); // 读取 16 字节为 ArrayBuffer

// 写入
addr.writeU8(0xFF);
addr.writeS32(-1);
addr.writeUtf8String("hello");
addr.writeByteArray([0x01, 0x02, 0x03, 0x04]);
addr.writePointer(ptr("0x12345678"));

// 链式读取结构体字段
// 假设 struct = { int type; int size; char* name; }
var type = addr.readS32();                           // offset 0
var size = addr.add(4).readS32();                    // offset 4
var namePtr = addr.add(8).readPointer();             // offset 8
var name = namePtr.readUtf8String();                 // 跟随指针读取字符串
console.log("type=" + type + " size=" + size + " name=" + name);
Memory.read* vs NativePointer.read*:自 Frida 14(2021)起,官方推荐使用 addr.readX() / addr.writeX() 形式,旧的 Memory.readS32(addr) 静态方法虽仍可用但已标记弃用,未来主版本可能移除。链式写法在读取结构体字段时更天然(addr.add(4).readS32() 一气呵成)。本篇 第五节仍会列出 Memory.* 形式,主要用于对照——新代码请优先用 NativePointer 实例方法。
64 位算术是安全的:add / sub / and / or / shr / shl 都在 NativePointer 内部以 64 位整数实现,不经过 JS Number,所以即使地址 >2^53 也不会丢精度。只有当你显式 toInt32() / toUInt32() / Number(...) 时才会落到 JS Number 上。
三、NativeFunction:从 JS 主动调用 Native 函数
NativeFunction 和下一节的 NativeCallback 是一对对称 API ── 一个负责 JS→Native,一个负责 Native→JS。先用一张图把它们的关系定位清楚,再分别讲:
NativeFunction 与 NativeCallback 的双向调用对称关系图3.1 为什么需要主动调用
第05篇讲了 Java 层的「主动调用」——直接从 Frida 脚本调用 App 的 Java 方法。Native 层同样需要这个能力。
场景一:你在 IDA 中发现 SO 内部有一个 decrypt(data, key, len) 函数。你想传入不同的密文测试它的解密行为——但这个函数不通过 JNI 暴露给 Java 层,App 自己也只在特定操作时才调用它。你需要直接从 Frida 脚本调用这个 Native 函数。
场景二:你想调用 libc 的 open、read、write 来读写目标进程中的文件——而不是从你自己的电脑上操作。因为目标进程可能有一些特殊的文件权限(如 App 私有目录 /data/data/包名/ 下的文件),从进程内部访问比从外部访问更方便。
场景三:调用 dlopen / dlsym 来手动加载一个 SO 并获取其中的函数地址。
3.2 基本语法
// NativeFunction(address, returnType, argTypes)
// - address: 函数的内存地址(NativePointer)
// - returnType: 返回值类型(字符串)
// - argTypes: 参数类型数组(字符串数组)

// 示例:调用 libc 的 strlen 函数
// C 原型: size_t strlen(const char *s);
var strlenAddr = Module.findExportByName("libc.so", "strlen");
var strlen = new NativeFunction(strlenAddr, "size_t", ["pointer"]);

var testStr = Memory.allocUtf8String("Hello World");
var len = strlen(testStr);
console.log("strlen = " + len);  // 11
3.3 类型系统
NativeFunction 支持的类型标识符:
| | |
|---|
"void" | void | |
"bool" | bool | |
"int" | int | |
"uint" | unsigned int | |
"int8" | int8_t | |
"uint8" | uint8_t | |
"int16" | int16_t | |
"uint16" | uint16_t | |
"int32" | int32_t | |
"uint32" | uint32_t | |
"int64" | int64_t | |
"uint64" | uint64_t | |
"long" | long | LP64(Linux/Android/macOS ARM64)= 8 字节;LLP64(Windows)= 4 字节 |
"ulong" | unsigned long | |
"size_t" | size_t | LP64 = 8 字节;LLP64 = 8 字节(Win64)/ 4 字节(Win32) |
"ssize_t" | ssize_t | |
"float" | float | |
"double" | double | |
"pointer" | void* | |
3.4 实用示例
// ====== 调用 libc 的 open/read/close 读取文件 ======
// 从目标进程内部读取 App 私有目录下的文件

var openAddr  = Module.findExportByName("libc.so", "open");
var readAddr  = Module.findExportByName("libc.so", "read");
var closeAddr = Module.findExportByName("libc.so", "close");

// int open(const char *pathname, int flags);
var open = new NativeFunction(openAddr, "int", ["pointer", "int"]);
// ssize_t read(int fd, void *buf, size_t count);
var read = new NativeFunction(readAddr, "ssize_t", ["int", "pointer", "size_t"]);
// int close(int fd);
var close = new NativeFunction(closeAddr, "int", ["int"]);

functionreadFile(path) {
var pathStr = Memory.allocUtf8String(path);
var fd = open(pathStr, 0);  // O_RDONLY = 0
if (fd === -1) {
console.log("[!] 无法打开: " + path);
returnnull;
    }

var buf = Memory.alloc(4096);
var bytesRead = read(fd, buf, 4096);
    close(fd);

if (bytesRead > 0) {
// ssize_t 在 ARM64 上以 Int64 返回,用 toNumber() 转 JS Number;
// 4KB 缓冲区远小于 2^53,安全。
return buf.readUtf8String(bytesRead.toNumber());
    }
returnnull;
}

// 读取 App 的 shared_prefs 文件
var content = readFile("/data/data/com.example.app/shared_prefs/config.xml");
if (content) {
console.log("[*] 文件内容:\n" + content);
}
// ====== 调用 SO 内部的解密函数 ======
// 假设通过 IDA 分析确定了函数签名:
//   int decrypt(const uint8_t* cipher, int cipher_len,
//               const uint8_t* key, int key_len,
//               uint8_t* plain_out);

varmodule = Process.findModuleByName("libcrypto_custom.so");
var decryptAddr = module.base.add(0x3A8C);  // IDA 中的偏移

var decrypt = new NativeFunction(decryptAddr,
"int",                                     // 返回值: int(解密后的明文长度)
    ["pointer", "int", "pointer", "int", "pointer"]  // 参数类型
);

// 准备参数
var cipher = Memory.alloc(32);
cipher.writeByteArray([
0xa1, 0xb2, 0xc3, 0xd4, 0xe5, 0xf6, 0x07, 0x18,
0x29, 0x3a, 0x4b, 0x5c, 0x6d, 0x7e, 0x8f, 0x90,
0x01, 0x12, 0x23, 0x34, 0x45, 0x56, 0x67, 0x78,
0x89, 0x9a, 0xab, 0xbc, 0xcd, 0xde, 0xef, 0xf0
]);

var key = Memory.allocUtf8String("my_secret_key_16");
var output = Memory.alloc(256);  // 预分配输出缓冲区

// 调用解密函数
var plainLen = decrypt(cipher, 32, key, 16, output);

if (plainLen > 0) {
console.log("[*] 解密成功,明文长度: " + plainLen);
console.log("[*] 明文(hex): " + hexdump(output, { length: plainLen }));
console.log("[*] 明文(str): " + output.readUtf8String(plainLen));
}
调用约定(ABI):Android ARM64 默认使用 AAPCS64,本系列实战不需关心。仅在跨平台(Windows x86 上的 stdcall)才需要在 new NativeFunction(addr, ret, args, { abi: 'stdcall' }) 中指定。
四、NativeCallback:让 Native 代码调用你的 JS 函数
4.1 NativeCallback 是什么
NativeFunction 的方向是「JS → Native」(你主动调用 Native 函数)。NativeCallback 的方向是反过来——「Native → JS」。它创建一个 Native 层可见的函数指针,当 Native 代码调用这个指针时,实际执行的是你写的 JavaScript 代码。
4.2 基本语法
// NativeCallback(callback, returnType, argTypes)
// - callback: JS 函数,Native 调用时执行
// - returnType: 返回值类型
// - argTypes: 参数类型

var myCallback = new NativeCallback(function(a, b) {
console.log("被调用了!a=" + a + " b=" + b);
return a + b;
}, "int", ["int", "int"]);

// myCallback 的 .handle 属性是 NativePointer,可以传给 Native 代码
console.log("回调函数地址: " + myCallback);
4.3 实战:替换函数指针
NativeCallback 最常见的用途是与 Interceptor.replace 配合——用你的 JS 函数完全替换一个 Native 函数的实现:
// 替换一个签名校验函数,让它永远返回成功
// 假设原始函数: int verify_signature(const char* data, const char* sig)
// 返回 0 表示验证成功,-1 表示失败

var verifySig = Module.findExportByName("libsecurity.so", "verify_signature");

Interceptor.replace(verifySig, new NativeCallback(function(dataPtr, sigPtr) {
var data = dataPtr.readUtf8String();
var sig = sigPtr.readUtf8String();
console.log("[bypass] verify_signature 被调用");
console.log("  data: " + data);
console.log("  sig: " + sig);

// 始终返回 0(验证通过)
return0;
}, "int", ["pointer", "pointer"]));

console.log("[*] verify_signature 已被替换");
4.4 NativeCallback 在回调注册中的应用
有些 Native API 接受函数指针作为回调参数。你可以用 NativeCallback 创建一个 JS 回调,注入到 Native 代码中:
// 假设 SO 中有一个注册日志回调的函数:
// void set_log_callback(void (*callback)(int level, const char* msg));

var setLogCallback = new NativeFunction(
    Module.findExportByName("libnative.so", "set_log_callback"),
"void",
    ["pointer"]
);

// 创建我们的日志回调
var myLogCallback = new NativeCallback(function(level, msgPtr) {
var msg = msgPtr.readUtf8String();
var levelStr = ["VERBOSE", "DEBUG", "INFO", "WARN", "ERROR"][level] || "UNKNOWN";
console.log("[Native LOG] [" + levelStr + "] " + msg);
}, "void", ["int", "pointer"]);

// 注册回调——之后 SO 内部的所有日志都会打印到 Frida 控制台
setLogCallback(myLogCallback);
console.log("[*] Native 日志回调已注册");
生命周期注意:NativeCallback 创建的回调函数指针只在 JS 的 NativeCallback 对象存活期间有效。如果这个 JS 对象被垃圾回收了,Native 代码再调用那个函数指针就会崩溃。确保将 NativeCallback 对象保存在全局变量中,避免被 GC。
五、Memory:读、写、搜索、分配
5.1 静态读写 API(与 NativePointer 实例方法等价)
2.5 节已经讲过 NativePointer 的链式读写方法。Memory.* 命名空间下还有一组等价的静态方法——两者功能完全相同,只是写法不同。下表是对照速查(推荐左列写法,右列只在需要对齐多列代码时使用):
| |
|---|
addr.readS8() / readU8() | Memory.readS8(addr) / readU8(addr) |
addr.readS16() / readU16() | Memory.readS16(addr) / readU16(addr) |
addr.readS32() / readU32() | Memory.readS32(addr) / readU32(addr) |
addr.readS64() / readU64() | Memory.readS64(addr) / readU64(addr) |
addr.readFloat() / readDouble() | Memory.readFloat(addr) / readDouble(addr) |
addr.readPointer() | Memory.readPointer(addr) |
addr.readUtf8String(n?) / readUtf16String(n?) | Memory.readUtf8String(addr, n?) / readUtf16String(addr, n?) |
addr.readByteArray(n) | Memory.readByteArray(addr, n) |
addr.writeS32(v) / writeU32(v) / ... | Memory.writeS32(addr, v) / writeU32(addr, v) / ... |
addr.writeUtf8String(s) | Memory.writeUtf8String(addr, s) |
addr.writeByteArray([...]) | Memory.writeByteArray(addr, [...]) |
addr.writePointer(p) | Memory.writePointer(addr, p) |
写入保护:你不能往只读内存(如 .text 代码段)直接写入数据,会触发段错误(SIGSEGV)。需要先用 Memory.protect 修改保护属性——见 5.4 节。
5.2 Memory.alloc:在目标进程中分配内存
Memory.alloc(size) 在目标进程的堆上分配指定大小的内存,返回一个 NativePointer 指向分配的地址。这块内存会被零初始化。
// 分配 1024 字节的内存
var buf = Memory.alloc(1024);
console.log("分配地址: " + buf);

// 在分配的内存中写入数据
buf.writeUtf8String("Hello");

// 分配并初始化为 UTF-8 字符串(便捷方法)
var str = Memory.allocUtf8String("Hello World");
// 等效于:
// var str = Memory.alloc(12);
// str.writeUtf8String("Hello World");

// 分配 UTF-16 字符串
var wstr = Memory.allocUtf16String("Hello World");

// 分配一个可以在 NativeFunction 调用中作为输出参数的缓冲区
var outputBuf = Memory.alloc(4096);
// 传给 Native 函数:someNativeFunc(input, inputLen, outputBuf);
// 调用后从 outputBuf 读取结果
内存生命周期:Memory.alloc 分配的内存的生命周期与返回的 JS 变量绑定。只要 JS 变量还被引用(不被 GC),内存就不会被释放。如果你把分配的地址传给 Native 代码长期使用(比如注册的回调中引用了这块内存),确保将 JS 变量保存在全局作用域中。
5.3 Memory.scan:在内存中搜索字节模式
Memory.scan 在指定的内存范围中搜索匹配特定字节模式的位置。这是内存取证和动态分析中的核心能力。
// Memory.scan(address, size, pattern, callbacks)
// - address: 搜索起始地址
// - size: 搜索范围大小(字节)
// - pattern: 匹配模式(IDA 风格的十六进制 + 通配符)
// - callbacks: { onMatch(address, size), onError(reason), onComplete() }
//   * onMatch 返回 'stop' 可提前终止扫描
//   * onError 在遇到访问越界 / 不可读分页时触发,不写则错误被吞

// ====== 示例一:搜索硬编码的字符串 ======
varmodule = Process.findModuleByName("libnative.so");
Memory.scan(module.base, module.size, "41 45 53 2F 43 42 43", {
// "AES/CBC" 的十六进制
onMatch: function(address, size) {
console.log("[FOUND] 'AES/CBC' 字符串 @ " + address);
console.log("  偏移: 0x" + address.sub(module.base).toString(16));
console.log("  上下文: " + hexdump(address.sub(8), { length: 32 }));
// return 'stop';  // 只要第一个匹配就返回这个,可大幅提速
    },
onError: function(reason) {
console.log("[!] scan error: " + reason);
    },
onComplete: function() {
console.log("[*] 搜索完成");
    }
});

// ====== 示例二:使用通配符搜索 ======
// ?? 表示任意一个字节
// 搜索模式: 48 89 ?? ?? 48 8B(x86_64 的常见指令序列)
// 在 ARM64 上搜索 STP X29, X30, [SP, #-0x??]! —— 函数序言
Memory.scan(module.base, module.size, "FD 7B ?? A9", {
onMatch: function(address, size) {
console.log("[FUNC] 可能的函数入口 @ " + address +
" (偏移 0x" + address.sub(module.base).toString(16) + ")");
    },
onComplete: function() {}
});

// ====== 示例三:搜索密钥特征 ======
// 搜索可能的 AES-128 密钥(16 字节连续非零数据后跟零字节)
// 这里演示搜索特定的已知密钥前缀
Memory.scan(module.base, module.size, "01 02 03 04 05 06 07 08", {
onMatch: function(address, size) {
console.log("[KEY?] 可能的密钥 @ " + address);
console.log(hexdump(address, { length: 32 }));
    },
onComplete: function() {}
});
同步版本 Memory.scanSync 直接返回匹配结果数组:
var matches = Memory.scanSync(module.base, module.size, "41 45 53");
console.log("找到 " + matches.length + " 处匹配");
matches.forEach(function(match) {
console.log("  @ " + match.address + " (size=" + match.size + ")");
});
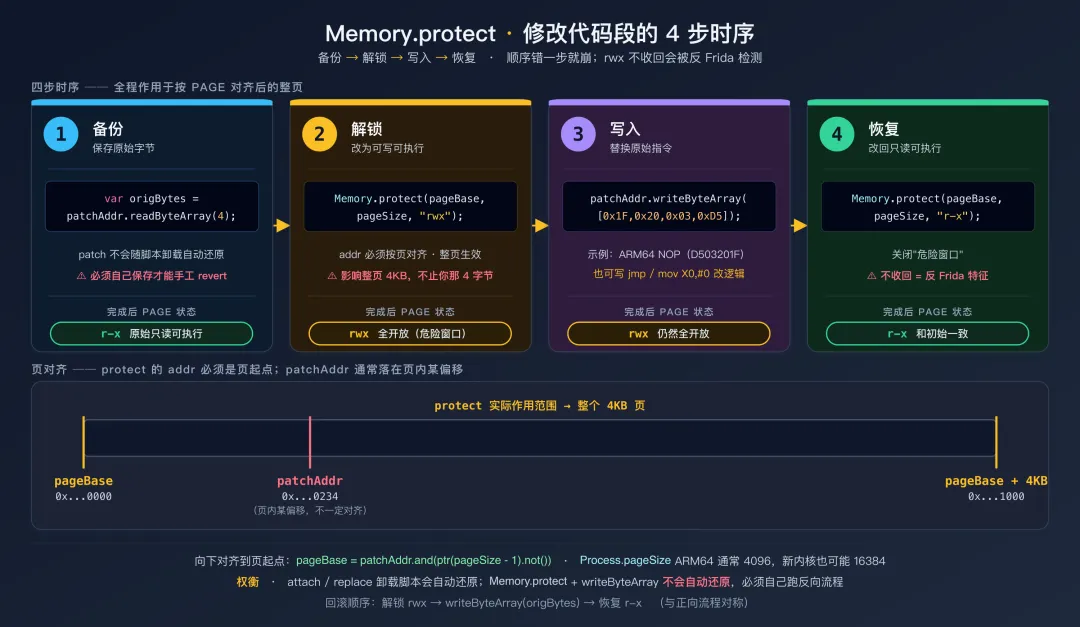
5.4 Memory.protect:修改内存保护属性
直接 patch 代码段是 4 步顺序流程,任何一步漏掉或者错位都会导致进程崩溃或被检测:
Memory.protect 修改代码段的 4 步时序图// Memory.protect(address, size, protection)
// protection 是一个字符串:r=读, w=写, x=执行
// 常见组合: "rwx"=可读可写可执行, "rw-"=可读可写, "r-x"=可读可执行
// 注意:address 必须按页对齐(Process.pageSize,ARM64 上是 4096 字节);
// size 也会被内核向上取整到整页。
varmodule = Process.findModuleByName("libnative.so");
var pageSize = Process.pageSize;
// patch 单条指令前先按页对齐:
var patchAddr = module.base.add(0x1234);
var pageBase = patchAddr.and(ptr(pageSize - 1).not()); // 向下对齐到页起点
// 1. 备份原始字节(patch 是不可逆的,必须自己保存)
var origBytes = patchAddr.readByteArray(4);
// 2. 临时改为可写可执行
Memory.protect(pageBase, pageSize, "rwx");
// 3. 写入新指令——这里是 ARM64 NOP(小端字节序:1F 20 03 D5 → 指令值 0xD503201F)
patchAddr.writeByteArray([0x1F, 0x20, 0x03, 0xD5]);
// 4. 恢复保护属性(重要!代码段长期 'rwx' 容易被 anti-frida 检测出来)
Memory.protect(pageBase, pageSize, "r-x");
// 如果要撤销 patch:再走一次 protect → writeByteArray(origBytes) → protect。
风险提醒:修改内存保护属性和直接 patch 代码是非常底层的操作。错误的修改可能导致进程崩溃,且 patch 不会随脚本卸载而恢复——必须自己保存和恢复原始字节。在大部分检测绕过场景中,优先使用 Interceptor.attach / Interceptor.replace(卸载脚本时自动还原);只有在 attach/replace 因调用约定怪异、热路径开销过大或被反 Hook 检测时,才回退到 Memory.protect + 直接 patch。
5.5 Memory.copy:复制内存
// Memory.copy(dst, src, n)
// 相当于 C 的 memcpy(dst, src, n)

var src = Memory.allocUtf8String("Hello World");
var dst = Memory.alloc(64);
Memory.copy(dst, src, 12);  // 复制 12 字节(含 null 终止符)
console.log(dst.readUtf8String());  // "Hello World"
Memory.copy 在把内存映像(SO 段、堆缓冲、共享映射等)转移到可控缓冲区时很常用,是 dump 类工具的基础操作。
六、hexdump:内存可视化分析的瑞士军刀
hexdump 不是一个「Memory」命名空间下的函数,而是 Frida 提供的全局工具函数。但它在 Native 层分析中几乎每个脚本都会用到。
6.1 基本用法
var addr = Memory.allocUtf8String("Hello Frida! This is a test string.");

// 最简用法
console.log(hexdump(addr));
输出:
             0  1  2  3  4  5  6  7  8  9  A  B  C  D  E  F  0123456789ABCDEF
7b8a4c1000  48 65 6c 6c 6f 20 46 72 69 64 61 21 20 54 68 69  Hello Frida! Thi
7b8a4c1010  73 20 69 73 20 61 20 74 65 73 74 20 73 74 72 69  s is a test stri
7b8a4c1020  6e 67 2e 00 00 00 00 00 00 00 00 00 00 00 00 00  ng..............
左侧是地址,中间是十六进制的字节值,右侧是 ASCII 可视化(不可打印字符显示为 .)。
6.2 配置选项
// hexdump(target, options)
// target: NativePointer 或 ArrayBuffer
// options: { offset, length, header, ansi }

// 指定 dump 长度
console.log(hexdump(addr, { length: 32 }));  // 只 dump 32 字节

// 从偏移位置开始 dump
console.log(hexdump(addr, { offset: 16, length: 16 }));

// 隐藏头部行
console.log(hexdump(addr, { length: 32, header: false }));

// 启用 ANSI 颜色(终端支持时更好看)
console.log(hexdump(addr, { length: 64, ansi: true }));
6.3 在 Hook 中使用 hexdump
// 分析加密函数的输入输出
Interceptor.attach(Module.findExportByName("libcrypto.so", "EVP_EncryptUpdate"), {
onEnter: function(args) {
// EVP_EncryptUpdate(EVP_CIPHER_CTX *ctx, unsigned char *out,
//                   int *outl, const unsigned char *in, int inl)
this.outPtr = args[1];    // 输出缓冲区
this.outlPtr = args[2];   // 输出长度指针
var inPtr = args[3];      // 输入数据
var inLen = args[4].toInt32();  // 输入长度

console.log("\n[EVP_EncryptUpdate]");
console.log("  输入 (" + inLen + " bytes):");
console.log(hexdump(inPtr, { length: Math.min(inLen, 128) }));
    },
onLeave: function(retval) {
var outLen = this.outlPtr.readS32();
console.log("  输出 (" + outLen + " bytes):");
console.log(hexdump(this.outPtr, { length: Math.min(outLen, 128) }));
    }
});
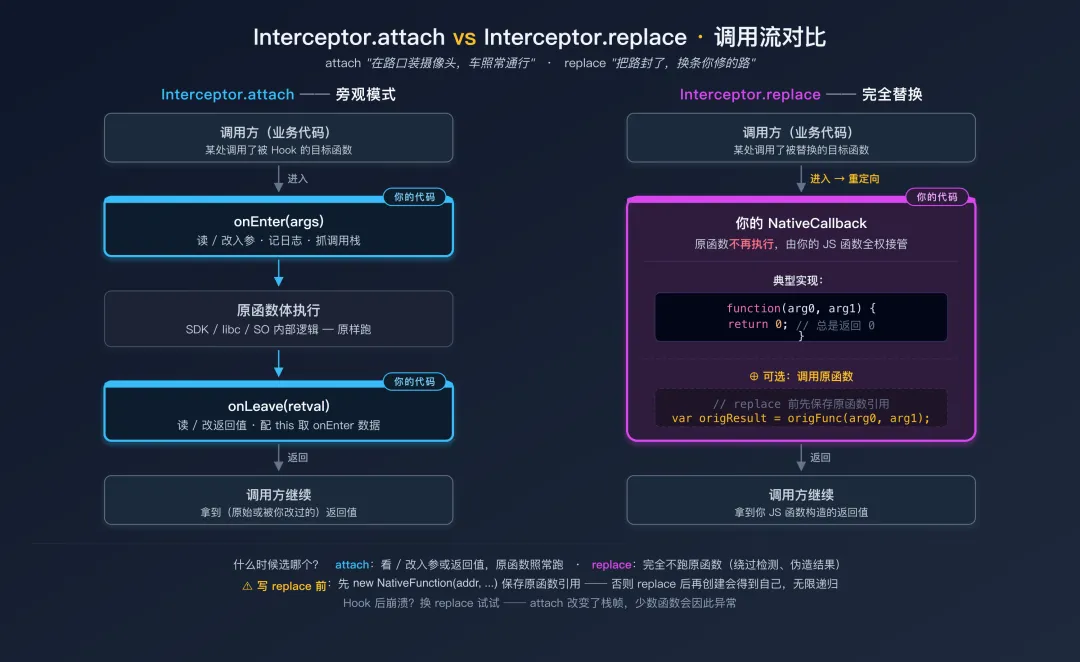
七、Interceptor.replace vs Interceptor.attach
7.1 两者的区别
Interceptor 有两个核心方法 ── attach 和 replace,它们的区别是:
Interceptor.attach:在函数入口和出口安装监听器(onEnter / onLeave)。原始函数正常执行,你只是旁观和记录。类比:在高速公路上加装摄像头,车照常通行,你只是拍照。
Interceptor.replace:用你提供的实现完全替换原始函数。原始函数不再执行(除非你在替换实现中主动调用它)。类比:把高速公路的一个出口封掉,换成你自己修的一条路。
把两者的调用流并排画出来,差异一目了然:
Interceptor.attach vs Interceptor.replace 调用流对比7.2 Interceptor.replace 用法
// ====== 完全替换函数实现 ======

// 替换一个返回 int 的检查函数
var checkRoot = Module.findExportByName("libsecurity.so", "check_root");
Interceptor.replace(checkRoot, new NativeCallback(function() {
console.log("[bypass] check_root 被调用,返回 0");
return0;  // 始终返回"未检测到 root"
}, "int", []));

// ====== 替换但仍可调用原始函数 ======
var origFunc = new NativeFunction(checkRoot, "int", []);

Interceptor.replace(checkRoot, new NativeCallback(function() {
// 先调用原始函数看看它本来会返回什么
var origResult = origFunc();
console.log("[bypass] check_root 原始结果: " + origResult + " → 替换为 0");
return0;
}, "int", []));
注意:在 Interceptor.replace 之前,先用 new NativeFunction(addr, ...) 保存原始函数的引用。replace 之后再创建 NativeFunction 会得到替换后的版本——调用它会递归调用你的替换函数,导致无限循环。
7.3 什么时候用 replace
| |
|---|
| attach |
| attach |
| replace |
| replace |
| replace |
| Hook 后 App 崩溃(attach 改变了栈帧等) | |
7.4 撤销 Hook
// 撤销对特定地址的 Hook/替换
Interceptor.revert(checkRoot);

// 撤销所有 Hook
Interceptor.detachAll();

// 确保所有修改立即生效
Interceptor.flush();
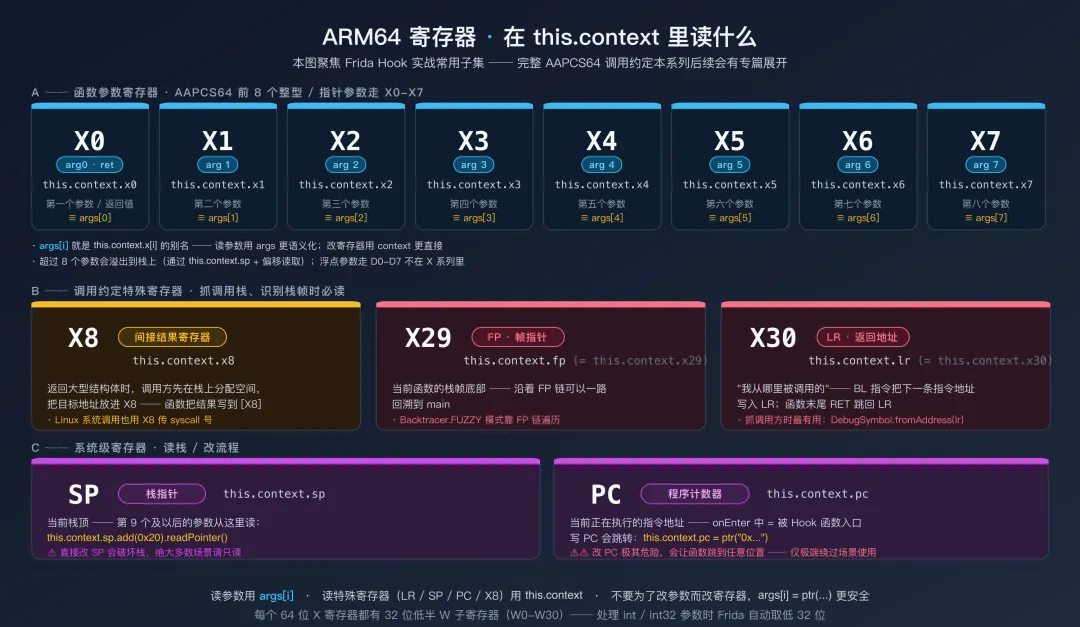
八、this.context:访问 CPU 寄存器
8.1 在 Interceptor 回调中读取寄存器
在 Interceptor.attach 的 onEnter 和 onLeave 回调中,this.context 提供了对当前 CPU 寄存器状态的完整访问。这在参数不通过标准方式传递(比如自定义调用约定)或者你需要读取特殊寄存器时很有用。
下图先把 ARM64 上 Frida Hook 实战常读的子集梳理清楚(完整 AAPCS64 调用约定本系列会有专篇展开):
ARM64 寄存器在 this.context 中的实战速查图Interceptor.attach(funcAddr, {
onEnter: function(args) {
// ARM64 寄存器
console.log("X0 (arg0): " + this.context.x0);
console.log("X1 (arg1): " + this.context.x1);
console.log("X2 (arg2): " + this.context.x2);
console.log("X3 (arg3): " + this.context.x3);
console.log("X4 (arg4): " + this.context.x4);
console.log("X5 (arg5): " + this.context.x5);
console.log("X6 (arg6): " + this.context.x6);
console.log("X7 (arg7): " + this.context.x7);
// 特殊寄存器
console.log("SP (栈指针): " + this.context.sp);
console.log("PC (程序计数器): " + this.context.pc);
console.log("LR (返回地址): " + this.context.lr);
console.log("FP (帧指针): " + this.context.fp);
// X29 就是 FP,X30 就是 LR
// X8 通常用于系统调用号或间接结果位置
// args[0] 本质上就是 this.context.x0 的别名
// 但 args 更语义化——推荐用 args 读参数,context 读特殊寄存器
},
onLeave: function(retval) {
// retval 等同于 this.context.x0
console.log("返回值(X0): " + this.context.x0);
}
});
8.2 修改寄存器
你也可以直接修改寄存器的值:
Interceptor.attach(funcAddr, {
onEnter: function(args) {
// 方式一:通过 args 修改参数(推荐)
        args[0] = ptr(1);  // 将第一个参数改为 1

// 方式二:通过 context 直接修改寄存器
this.context.x0 = ptr(1);  // 同上

// 修改 PC 寄存器可以跳转到其他地址(极其危险!)
// this.context.pc = ptr("0x...");  // 不推荐

// 修改 SP 可以操控栈(同样危险)
// this.context.sp = ...;
    }
});
8.3 onEnter 和 onLeave 之间传递数据
this 对象在同一次函数调用的 onEnter 和 onLeave 之间是共享的。你可以用它来在进入和退出时传递数据:
Interceptor.attach(funcAddr, {
onEnter: function(args) {
// 保存参数,在 onLeave 中使用
this.inputPtr = args[0];
this.inputLen = args[1].toInt32();

// 保存输出缓冲区指针(函数会写入结果)
this.outputPtr = args[2];
    },
onLeave: function(retval) {
// 在 onLeave 中使用 onEnter 保存的数据
console.log("输入:");
console.log(hexdump(this.inputPtr, { length: this.inputLen }));

var outputLen = retval.toInt32();
if (outputLen > 0) {
console.log("输出:");
console.log(hexdump(this.outputPtr, { length: outputLen }));
        }
    }
});
不要用全局变量传递数据:在多线程环境中(Android App 几乎都是多线程的),如果两个线程同时调用被 Hook 的函数,全局变量会互相覆盖,导致数据错乱。this 对象是每次调用独立的,线程安全。
九、Process 与 Module:进程级信息查询
9.1 Process 对象
// 基本信息
console.log("进程 PID: " + Process.id);
console.log("CPU 架构: " + Process.arch);       // "arm64", "arm", "x64", "ia32"
console.log("平台: " + Process.platform);        // "linux" (Android 基于 Linux)
console.log("页大小: " + Process.pageSize);       // 通常 4096 (4KB)
console.log("指针大小: " + Process.pointerSize); // 8 (64位) 或 4 (32位)
9.2 枚举内存范围
Process.enumerateRanges 返回进程中符合指定保护属性的所有内存映射区域。这在搜索内存、分析内存布局时很有用:
// 枚举所有可读可写的内存区域
var rwRanges = Process.enumerateRanges("rw-");
console.log("[*] 可读可写内存区域: " + rwRanges.length + " 个\n");

rwRanges.forEach(function(range) {
console.log("  " + range.base + " - " + range.base.add(range.size) +
" (" + (range.size / 1024).toFixed(1) + " KB)");
if (range.file) {
console.log("    文件: " + range.file.path + " (offset: 0x" +
                    range.file.offset.toString(16) + ")");
    }
});

// 枚举可执行的内存区域(代码段)
var rxRanges = Process.enumerateRanges("r-x");
console.log("\n[*] 代码段: " + rxRanges.length + " 个");
在全进程内存中搜索:结合 Process.enumerateRanges 和 Memory.scan,可以在整个进程的所有可读内存中搜索特征数据 ── SO dump、内存取证、密钥定位都靠这个组合。
9.3 枚举线程
var threads = Process.enumerateThreads();
console.log("[*] 线程数: " + threads.length);

threads.forEach(function(thread) {
console.log("  TID: " + thread.id + " 状态: " + thread.state);
// thread.state: "running", "stopped", "waiting", "uninterruptible", "halted"
// thread.context: 可以读取该线程的寄存器状态
});
9.4 Module 对象
varmodule = Process.findModuleByName("libnative.so");

if (module) {
console.log("模块名: " + module.name);
console.log("基地址: " + module.base);
console.log("大小: " + module.size + " (" + (module.size / 1024).toFixed(1) + " KB)");
console.log("路径: " + module.path);

// 枚举导出
var exports = module.enumerateExports();
// 枚举导入
var imports = module.enumerateImports();
// 枚举符号(包含更多调试信息)
var symbols = module.enumerateSymbols();

console.log("导出: " + exports.length + " 个");
console.log("导入: " + imports.length + " 个");
console.log("符号: " + symbols.length + " 个");
}

// 通过导出名查找地址——两种方式
// 方式一:全局搜索(遍历所有模块找到第一个匹配)
//   Frida ≥ 16.7 推荐写法:
var addr1 = Module.findGlobalExportByName("open");
//   旧写法(≤ 16.6 仍可用,但已被标记为兼容用法):
//   var addr1 = Module.findExportByName(null, "open");

// 方式二:限定模块
var addr2 = Module.findExportByName("libc.so", "open");

// findExportByName / findGlobalExportByName 找不到时返回 null
// getExportByName / getGlobalExportByName 找不到时抛异常(更适合"必须存在"的导出)
var addr3 = Module.getExportByName("libc.so", "open");
十、实战:监控文件访问——Hook libc 核心函数
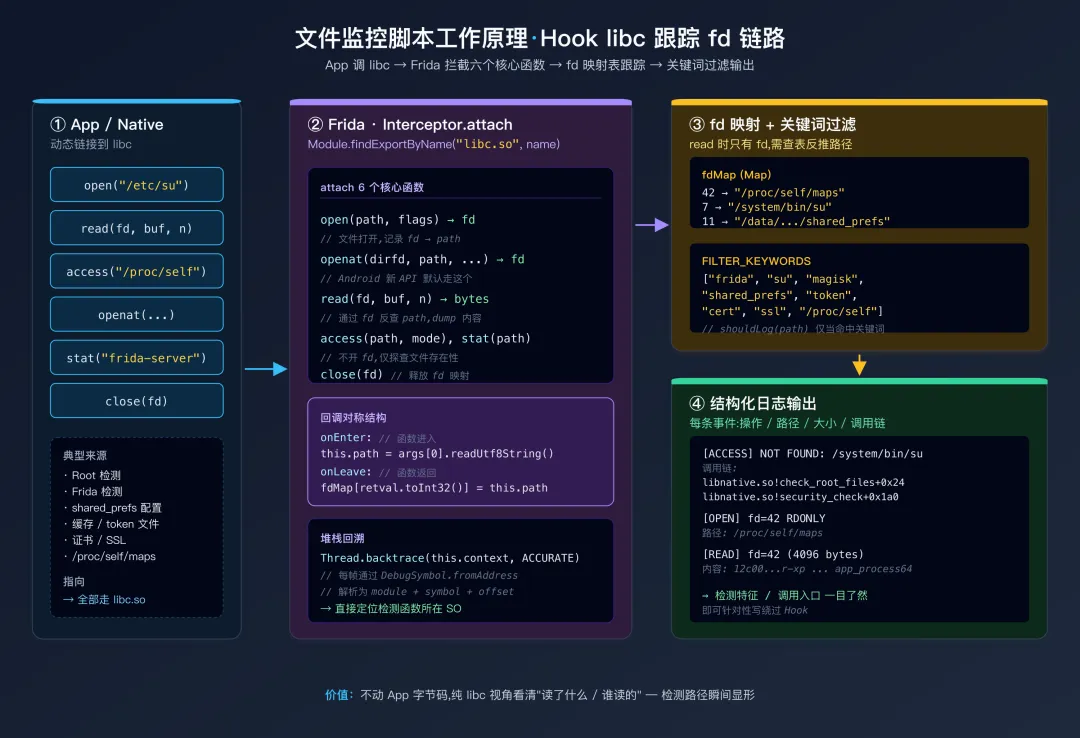
综合运用本篇学到的 API,写一个实用工具:监控目标 App 的所有文件访问操作。这在分析 App 行为(读了什么配置文件、写了什么缓存、检测了哪些 Root 特征文件)时非常有价值。
// file_monitor.js
// 监控目标 App 的所有文件操作
// 用法: frida -U -f com.example.app -l file_monitor.js --no-pause

// ====== 配置 ======
var SHOW_ALL = false;          // true=显示所有文件操作, false=只显示感兴趣的
var FILTER_KEYWORDS = [
"frida", "su", "magisk",   // Root/Frida 检测
"shared_prefs", "config",  // 配置文件
"token", "session",        // 认证相关
"cert", "ssl", "trust",    // 证书相关
"/proc/self"// 进程自检
];

// ====== 辅助函数 ======
functionshouldLog(path) {
if (SHOW_ALL) returntrue;
if (!path) returnfalse;
var lowerPath = path.toLowerCase();
for (var i = 0; i < FILTER_KEYWORDS.length; i++) {
if (lowerPath.indexOf(FILTER_KEYWORDS[i]) !== -1) returntrue;
    }
returnfalse;
}

functiongetBacktrace(ctx) {
return Thread.backtrace(ctx, Backtracer.ACCURATE)
        .map(function(addr) {
return"    " + DebugSymbol.fromAddress(addr).toString();
        })
        .slice(0, 5)
        .join("\n");
}

// 跟踪 fd → 文件路径 的映射
var fdMap = {};

// ====== Hook open ======
var openAddr = Module.findExportByName("libc.so", "open");
Interceptor.attach(openAddr, {
onEnter: function(args) {
this.path = args[0].readUtf8String();
this.flags = args[1].toInt32();
    },
onLeave: function(retval) {
var fd = retval.toInt32();
if (fd >= 0 && this.path) {
            fdMap[fd] = this.path;  // 记录 fd 对应的文件路径

if (shouldLog(this.path)) {
var flagStr = "";
// 注意:O_RDONLY/O_WRONLY/O_RDWR 是值(0/1/2),不是位标志,
// 必须用 mask(O_ACCMODE = 0x3)取低 2 bit 后比较,不能用 &。
var mode = this.flags & 0x3;
if (mode === 1) flagStr += "WRONLY ";
elseif (mode === 2) flagStr += "RDWR ";
else flagStr += "RDONLY ";
// 下面的 O_CREAT / O_TRUNC / O_APPEND 才是位标志,用 & 检测正确。
if (this.flags & 0x0040) flagStr += "CREAT ";
if (this.flags & 0x0200) flagStr += "TRUNC ";
if (this.flags & 0x0400) flagStr += "APPEND ";

console.log("\n[OPEN] fd=" + fd + " " + flagStr.trim());
console.log("  路径: " + this.path);
console.log("  调用链:\n" + getBacktrace(this.context));
            }
        }
    }
});

// ====== Hook openat(很多新版本 Android API 使用 openat 而不是 open)======
var openatAddr = Module.findExportByName("libc.so", "openat");
if (openatAddr) {
    Interceptor.attach(openatAddr, {
onEnter: function(args) {
// int openat(int dirfd, const char *pathname, int flags, ...);
this.path = args[1].readUtf8String();
this.flags = args[2].toInt32();
        },
onLeave: function(retval) {
var fd = retval.toInt32();
if (fd >= 0 && this.path) {
                fdMap[fd] = this.path;

if (shouldLog(this.path)) {
console.log("\n[OPENAT] fd=" + fd);
console.log("  路径: " + this.path);
console.log("  调用链:\n" + getBacktrace(this.context));
                }
            }
        }
    });
}

// ====== Hook read ======
var readAddr = Module.findExportByName("libc.so", "read");
Interceptor.attach(readAddr, {
onEnter: function(args) {
this.fd = args[0].toInt32();
this.buf = args[1];
this.count = args[2].toInt32();
    },
onLeave: function(retval) {
var bytesRead = retval.toInt32();
var path = fdMap[this.fd];

if (bytesRead > 0 && path && shouldLog(path)) {
console.log("\n[READ] fd=" + this.fd + " (" + path + ") " +
                        bytesRead + "/" + this.count + " bytes");

// 尝试显示读取的内容(前 64 字节)
var showLen = Math.min(bytesRead, 64);
try {
var content = this.buf.readUtf8String(showLen);
if (content && content.length > 2) {
console.log("  内容(text): " + content.substring(0, 128));
                } else {
console.log("  内容(hex):\n" + hexdump(this.buf, { length: showLen }));
                }
            } catch(e) {
console.log("  内容(hex):\n" + hexdump(this.buf, { length: showLen }));
            }
        }
    }
});

// ====== Hook access(检测文件是否存在,常用于 Root 检测)======
var accessAddr = Module.findExportByName("libc.so", "access");
Interceptor.attach(accessAddr, {
onEnter: function(args) {
this.path = args[0].readUtf8String();
    },
onLeave: function(retval) {
if (shouldLog(this.path)) {
var result = retval.toInt32() === 0 ? "EXISTS" : "NOT FOUND";
console.log("\n[ACCESS] " + result + ": " + this.path);
console.log("  调用链:\n" + getBacktrace(this.context));
        }
    }
});

// ====== Hook close ======
var closeAddr = Module.findExportByName("libc.so", "close");
Interceptor.attach(closeAddr, {
onEnter: function(args) {
var fd = args[0].toInt32();
if (fdMap[fd]) {
delete fdMap[fd];
        }
    }
});

// ====== Hook stat / lstat(文件状态查询)======
["stat", "lstat", "__xstat64", "stat64"].forEach(function(name) {
var addr = Module.findExportByName("libc.so", name);
if (addr) {
        Interceptor.attach(addr, {
onEnter: function(args) {
this.path = args[0].readUtf8String();
            },
onLeave: function(retval) {
if (shouldLog(this.path)) {
var result = retval.toInt32() === 0 ? "EXISTS" : "NOT FOUND";
console.log("[STAT] " + result + ": " + this.path);
                }
            }
        });
    }
});

console.log("╔══════════════════════════════════════╗");
console.log("║  文件访问监控已启动                     ║");
console.log("║  过滤关键词: " + FILTER_KEYWORDS.join(", "));
console.log("╚══════════════════════════════════════╝\n");
运行这个脚本后,当 App 进行 Root 检测时,你会看到类似这样的输出:
[ACCESS] NOT FOUND: /system/app/Superuser.apk
  调用链:
    0x7a8b004a90 libnative.so!check_root_files+0x24
    0x7a8b003c48 libnative.so!security_check+0x1a0

[ACCESS] NOT FOUND: /system/bin/su
  调用链:
    0x7a8b004ab8 libnative.so!check_root_files+0x4c
    0x7a8b003c48 libnative.so!security_check+0x1a0

[OPEN] fd=42 RDONLY
  路径: /proc/self/maps
  调用链:
    0x7a8b005120 libnative.so!check_frida_maps+0x18
    0x7a8b003cd0 libnative.so!security_check+0x228

[READ] fd=42 (/proc/self/maps) 4096/4096 bytes
  内容(text): 12c00000-12c01000 r-xp 00000000 fd:00 9876 /system/bin/app_process64
通过这些日志,你可以清楚地看到 App 的 Root/Frida 检测都在检查什么文件,调用链指向了 SO 中的具体函数——为后续的绕过工作提供了精准的目标。
文件监控脚本工作原理
十一、实用速查:Native 层常用操作代码片段
// ============================================================
// Frida Native 层 API 速查 —— 复制即用的代码片段
// ============================================================

// ====== 1. 查找模块和函数 ======
var mod = Process.findModuleByName("libnative.so");
var addr = Module.findExportByName("libc.so", "open");
var funcByOffset = mod.base.add(0x1234);

// ====== 2. Hook 导出函数 ======
Interceptor.attach(Module.findExportByName("libc.so", "strcmp"), {
onEnter: function(args) {
var s1 = args[0].readUtf8String();
var s2 = args[1].readUtf8String();
console.log("strcmp('" + s1 + "', '" + s2 + "')");
    }
});

// ====== 3. Hook 偏移函数 ======
var funcAddr = Process.findModuleByName("libnative.so").base.add(0x4A8C);
Interceptor.attach(funcAddr, {
onEnter: function(args) {
console.log("arg0: " + args[0]);
console.log(hexdump(args[0], { length: 32 }));
    }
});

// ====== 4. 替换函数 ======
Interceptor.replace(
    Module.findExportByName("libsec.so", "is_rooted"),
new NativeCallback(function() { return0; }, "int", [])
);

// ====== 5. 主动调用 Native 函数 ======
var strlen = new NativeFunction(
    Module.findExportByName("libc.so", "strlen"), "size_t", ["pointer"]);
var str = Memory.allocUtf8String("hello");
console.log("strlen = " + strlen(str));

// ====== 6. 内存搜索 ======
var mod = Process.findModuleByName("libnative.so");
Memory.scanSync(mod.base, mod.size, "41 45 53").forEach(function(m) {
console.log("match @ " + m.address);
});

// ====== 7. 内存分配与写入 ======
var buf = Memory.alloc(256);
buf.writeUtf8String("injected data");
buf.add(64).writeU32(0xDEADBEEF);

// ====== 8. Native 调用堆栈 ======
Interceptor.attach(addr, {
onEnter: function(args) {
console.log(Thread.backtrace(this.context, Backtracer.ACCURATE)
            .map(DebugSymbol.fromAddress).join("\n"));
    }
});

// ====== 9. 读取 ARM64 寄存器 ======
Interceptor.attach(addr, {
onEnter: function(args) {
console.log("X0=" + this.context.x0);
console.log("LR=" + this.context.lr);
console.log("SP=" + this.context.sp);
    }
});

// ====== 10. 监听 SO 加载(Frida ≥16.7:findGlobalExportByName)======
Interceptor.attach(Module.findGlobalExportByName("android_dlopen_ext"), {
onEnter: function(args) {
this.path = args[0].readUtf8String();
    },
onLeave: function(retval) {
if (this.path && this.path.indexOf("target") !== -1) {
console.log("SO loaded: " + this.path);
        }
    }
});
总结
把本篇浓缩成几条最容易踩坑、且不显而易见的要点:
- NativePointer 是 64 位安全的——
add/sub/and/or/shr 都不会丢精度,只有显式 toInt32() / Number(...) 时才落到 JS Number。从 Frida 14 起,所有读写优先用 addr.readX() 链式写法,Memory.read* 静态形式已弃用。 - NativeCallback 与 Memory.alloc 都受 JS GC 控制——把它们交给 Native 长期持有时(注册回调、传给后台线程),必须在 JS 端用全局变量保活,否则随时会崩。
this 是 onEnter/onLeave 间唯一线程安全的传递通道——多线程 App 用全局变量传参一定会串。- Interceptor.replace 之前要先
new NativeFunction(addr, ...) 保存原函数引用,否则 replace 后再创建会得到自己,导致无限递归。 - **
Memory.protect 改完代码段后请改回 r-x**——长期保留 rwx 是最常见的反 Frida 检测特征之一;并自己备份原始字节,patch 不会随脚本卸载自动还原。
文件监控实战脚本(file_monitor.js)把以上要点全部综合在一个真实工作流里——它不是教学玩具,可直接用于 Root/Frida 检测溯源。